How To Lay A Concrete Base

How To Lay A Concrete Base

Follow these steps for the best DIY project

If you are going to be laying a concrete floor for a DIY project it is important that careful preparation is made and each recommended step is followed. You may want to consider hiring a professional to do the work for you. Or at least certain parts. Perhaps the messier steps! Let’s take a look at how to lay a concrete base with this handy guide:

Mark Out Required Area

The first step is to mark out the required area for your concrete base, this can be done using pegs and string. And will need to be 100% accurate. So, make sure all sides are straight.

Dig Out The Area

Next, it is time to dig out the area you have just measured. Dig the ground in the marked area to around 175mm deep for a smaller shed or 225mm for a larger one. As you are going to need a level base it is a good idea to keep the depth you are digging as consistent as you can. Afterwards, remove the pegs.

dd Crushed Stone To Dust

For this step, you will need an MOT type 1 stone, this is crushed stone from 40mm to dust or gravel. Shovel into the space a minimum thickness layer of 75mm to form a hard base for the concrete layer. The depth should be about 100mm for a shed and around 150mm for something larger like a summerhouse. 

Measure, Cut And Fit 100m Timber Rails

Now it’s time to measure and cut and fit 100mm timber rails to the base and make sure the framework is level. This step is to create a framework that offers a strong and stable edge to the concrete and to ensure it is level.

Spread Out Layer 

Spread out that layer of MOT stone or gravel. Then use either a manual earth rammer or powered wacker plate to compact it. This will help create a firm base for the concrete and stop it from cracking over time.

Mix The Concrete 

So, now it is time to mix the concrete. Spread it out evenly and level it off. After smoothing over, grab a stiff broom to lightly brush across the base helping to encourage a textured non-slip surface. 

Keep an eye on the weather forecast at all times. At this stage, if wet weather is forecast cover the base with polythene or a tarpaulin for 24 hours. If it’s hot weather instead then use sacking and keep it damp for a day otherwise the concrete could too dry quickly. This will result in shrinkage and even cracking. You then need to leave it for at least three days to cure.

Finishing Touches 

For finishing touches, look to see if your base is flush with the ground. If this is the case, you will have a space running around the edge of the concrete where the rails were. You can fill this with pea gravel, it will help drain away moisture from the concrete base. Now you just need to place on your base whatever your intended item was!

We hope that our blog has helped you understand how to lay a concrete base. If you have any questions please don’t hesitate to give us a call on 01442 389105 or alternatively head over to our contact page to fill in our online enquiry form. 

The post How To Lay A Concrete Base first appeared on Base Concrete.

Volumetric or Ready Mix

Volumetric or Ready Mix

What’s The Difference?

Concrete is, without a doubt, one of the most common construction materials. This is because it can be used for a wide variety of projects. It is essentially a blend of water, Portland cement, and aggregates. The two basic types of concrete used in the construction industry are site-mixed concrete and ready-mix concrete.

There are slight differences between these two types of concrete. It is important to be aware of the differences, even if they seem subtle to you, as doing so can make it easier to choose the right concrete for your project. Here are the major differences between site-mixed and ready-mix concrete:

Preparation

One of the obvious differences between these two types of concrete is the way they are mixed. Ready-mix concrete is usually manufactured at a plant and delivered to the clients in a ready-to-use state. It’s typically sold by volume, which is measured in cubic meters.

Site-mixed concrete, on the other hand, is prepared at the client’s construction location. The components are mixed in specific ratios to achieve different degrees of strength. When making this type of concrete, caution must be taken to avoid quality issues.

Time

If you are working on a time-conscious project, it’s obvious that speed is important. In such a case, you should choose ready-mix concrete, as it’s easier to load and off-load, which may save you time.

Volumetric concrete is more time consuming to work with, as you have to pause part of the project while the mix is being created.

Equipment

An important factor for any construction project is your equipment and where you can source what you need. Volumetric concrete requires the use of equipment such as batch mixers. Whereas, ready-mix concrete does not require the project owner to hire equipment, as the concrete is not made on-site.

Convenience

Ready-mix concrete is convenient for almost any kind of construction project, as it can be delivered to multiple sites within the project location. However, volumetric concrete has to be mixed as close as possible to the point of use to avoid contamination.

Another major difference between ready-mix concrete and volumetric concrete is storage requirements. You will require controlled storage space for the materials used to make volumetric concrete. However, when using ready-mix concrete you won’t need any extra storage space.

Quality

Ready-mix concrete has a better and more consistent quality when compared to site-mixed concrete. This is because ready-mix concrete is mixed in an automated and controlled environment.

Material takeoff

The materials used to make site-mixed concrete have to be estimated individually and purchased separately. However, ready-mix concrete is simply calculated as a single item.

Waste

Working with site-mixed concrete causes material loss not only when the materials are being mixed but also during storage. Whereas, ready-mix concrete causes minimal waste on your site because the concrete is delivered in a ready-to-use state.

Workforce

When working with ready-mix concrete, the only time you may require skilled labour is when pouring and compacting the concrete. However, you will require more man-hours when working with volumetric concrete.

In summary,

Both types of concrete have some major differences. It is important to research which type of concrete is best for your construction project. Generally, ready-mix concrete is a better option as it can be used for a wider variety of projects.

if you have any questions make sure to contact us.

The post Volumetric or Ready Mix first appeared on Base Concrete.

Did you miss our previous article…
https://www.akbarconcreteworks.com/?p=217

Phytodepuration with Degre.47

Phytodepuration with Degre.47

Depurating Landscape: an introduction to plants as a water treatment alternative

This article is a collaboration between Degré47 and Critical Concrete, aiming to be an introduction to phyto purification’s general concepts for self-constructors. It also aims to shed light on these systems as low-cost, low-tech and self-constructible wastewater treatment solutions.

Degre.47 Logo

The wastewater issue

It isn’t new to argue that the disorganized and centralized population growth in urban areas has brought challenges to the natural environment. In addition to CO₂ emissions, waste production and impermeabilization of soil, wastewater is one of the fundamental issues local governments need to address. At the very least, the wastewater from human activities of any sort needs to be treated to be assimilated by nature.

There are many water treatment solutions, from the collective to the individual scale. One of the most common sanitation solutions in urban centres is a collective one: wastewater treatment plants. These centres manage the wastewater through physical, chemical and biological processes in a complex and highly specialized infrastructure. [1]

After the physical filtration through decantation, flotation, filters and/or membranes, traditional treatments commonly make use of chemical products, notably coagulants (ferric chloride, aluminium sulphate, etc.), flocculants, and sometimes disinfectants such as chlorine or ozone. These processes, however, are arguably costly and energy-intensive, not to mention polluting. They also necessarily generate by-products such as coarse waste, sand and sludge that must be cleaned, decanted, stabilised and treated. [2]

In addition, in the ever-growing urban centres, many areas aren’t able to access the public sewage system, bringing up the importance to think of alternatives for wastewater treatment, especially low-cost and low-maintenance ones, as the mismanagement of effluents can pose a serious issue to natural hydric resources. [3]

Individual or small-scale collective sanitation solutions might be a good way to tackle the situation. A solution that stands out is the phyto-purification system with its low energy and low maintenance (as there’s no need for emptying and transporting). It is already the main sanitation system in France for cities of less than 1,000 inhabitants. [4]

This system, which is based on the use of plants (phyto) to filter the wastewater has been proving to be a low-cost yet highly efficient way to treat domestic wastewater. Because it is energetically and logistically autonomous, phyto-purification can be considered an ecological sanitation solution.

Purification with plants

Phyto-purification consists of wastewater purification systems that make use of aquatic plants, reproducing water depuration processes typical of humid areas. There are two main methods of phyto purification: lagooning, which consists of ponds with microphytes, similar to natural wetlands, and the filters planted that make use of macrophytes and consist of ponds filled with aggregates in which the water circulates for treatment. [5]

In these systems, the plants are responsible for bringing oxygen through their roots whereas the aggregates act not only as a physical filter — as bigger particles can’t penetrate it — but also as a chemical filter as they absorb phosphorus and ammoniacal nitrogen. In these basins, an important biological process also occurs: the microfauna present in the system degrades organic matter, turning it into nutrients to be absorbed by the plants. [6]

The interesting aspect is that, although the name might indicate, the wastewater is not filtered by the plants. In reality, the plants are the key element to create the environment for bacterial activity, especially in the region around the plants’ roots. The plants greatly benefit from the system as it absorbs nutrients that are liberated in the process of depuration. It’s a symbiotic relationship.

The different methods

There are two groups of phyto purification systems that can be used according to different needs and types of wastewater: lagooning and filters planted. [7]

Lagooning

This system makes use of microphytes (small aquatic plants), microorganisms and (sometimes) substrate to control water pollution. Its main characteristic is the resemblance with natural wetland areas in which the majority of elements are saturated, i.e submerged in water. [8]

In this model, the main purification process occurs on the aquatic surface where the plants and the bacteria present in their roots are located.  In this solution, the effluent is continuously supplied and homogeneously distributed on the surface, flowing horizontally and superficially at low scooping velocity. The water is then collected by a drainage pipe located in the basin’s bottom. [9]

It is important to stress that in this solution, the substrate is not a requirement, and when not applied, fluctuant aquatic species should be used (see image 1). [10]

fig. 1: Different types of plants

Because there’s no emphasis on physical filtration with a substrate, this solution requires a previous treatment focused on the removal of organic matter and suspended solids as it mainly targets the removal of nutrients, especially phosphorus by the plants and bacteria. [11] The use of a substrate, however, can be beneficial if residual suspended solids end up in the basin.

This is a cheap and very low maintenance option, however, it generally requires a larger area than other methods.

fig. 2: surface flow filter with substrate and emergent plants

Filters planted

In this model, the system works through percolation, meaning the wastewater infiltrates the substrate in the process of purification. Here the substrate can be saturated or not. [12]

In this system, the water flows under the surface of the planted bed, through the pores of the substrate. There are two subsurface models: the horizontal flow filter and the vertical flow filter.

In the horizontal model, the flow can be operated in a continuous input, intermittent or even in batch mode whereas the vertical flow model requires intermittent dumping of water in short periods, followed by long resting intervals.

fig. 3: subsurface horizontal flow filter

The long periods between inflow in the vertical flow basin results in a high rate of oxygen transfer from the atmosphere to the system. In aerobic conditions the nitrification can occur, potentiating the nitrogen. In the horizontal flow basin, the poor levels of oxygen favor the occurrence of denitrification by anaerobic bacteria. [13]

fig. 4: subsurface vertical flow filter

In some cases, both flows can be combined to enhance the system’s performance. That’s the case of the double planted filter method applied by Kevin Quentric and documented and published as a tutorial by low-tech lab. [14]

It consists of two different units with a vertical and a horizontal water flow that perform complementary tasks in the process of depurating the wastewater.

fig. 5: section of double filter planted

The first phase of this system is a 60-80 cm² deep vertical filter (VF) which is divided into two parts and each part takes turns receiving the raw sewage (wastewater without previous treatment) from above (see fig. 6). The wastewater spreads on the surface of the first filter and has its solid particles such as hair, fat, faeces, etc, drying and decomposing on the surface whereas the water infiltrates downwards until it reaches the gravel layer. It might sound like the perfect recipe for a smelly garden but, as Kévin explained in emails to us, in a nutshell, bad smells occur in warm, low oxygen environments, when the water stagnates and fermentation takes place. In this double filter planted, however, the vertical filter is in open air, meaning it’s fairly oxygenated. The coarse material retained on the surface of the sand dries out and compost whereas the wastewater quickly infiltrates, without time to ferment. For this, the occurrence of smells is rather rare.

After the percolation, the water then is collected by a drain in the bottom of the VF. This phase of the process is aerobic: the bacteria present in it require oxygen to mineralize the organic particles making the compounds absorbable by the plants.

fig. 6: plan of double filter planted

The second part of the system, the horizontal filter (HF) is 60cm deep, filled with gravel and water 10 cm below the substrate. The second filter is then a poorly oxygenated environment, in which anaerobic bacteria live. These bacteria perform the important task of denitrifying the water by extracting the oxygen from the nitrate molecules, turning them into dinitrogen.

Another interesting aspect is that this system is energetically autonomous. For that, it relies on gravity: each stage into the water purification is lower than the previous one so the water can flow without the use of pumps.

The step-by-step for this method can be found on the low-tech lab site. [15]

Pretreatment

In the double planted filter by Kevin Quentric there’s no need for primary treatment and the raw sewage can be discharged directly on the first filter. In some models, however, pretreatment is required before the wastewater discharge for removal of coarse particles and settleable solids in order to prolong the useful life of the systems, minimising the occurrence of clogging.

The specific type of pretreatment depends on the type of sewage and on the chosen method of phyto purification. Some of the primary treatment methods are:

Screening: This is typically the first step, especially for surface flow filters. Screens are used to remove large debris. [16]Oil removal by decantation: The method is based on injecting fine air bubbles into the grease tank, allowing the grease to rise quickly to the surface (grease is hydrophobic). [17]Sedimentation: Water is typically retained in sedimentation basins for at least 4 hours, allowing particles to settle out. [18]

Domestic phyto-purification

The management of wastewater is of extreme responsibility but depending on which system is chosen and the knowledge of the builders, self-construction is an accessible and plausible option. In addition, professionals in the field can provide help for those seeking to build their own phyto-purification system at home.

When planning a phyto-purification system, some things must be taken into consideration, such as sizing, site and botanical species.

Choosing a site

Ideally, the system should be located as close as possible to the sewage outlet. Remember to make sure the system works with gravity by building it on a slope or working with built and excavated basins. Earthwork is also an option but it might significantly increase the costs of the construction. In the elected site for construction, the soil should be sufficiently compacted to minimise groundwater infiltration and should be above the water table and floodplains.

Another aspect to have in mind is that phyto purification requires space. The site of construction should be of sufficient size to meet current and possible future expansions. Also, insects (especially on surface flow models) and, very rarely, odours can pose discomfort. Therefore, make sure the system is not too close to your and/or the neighbour’s house.

Lastly, the site should be very accessible to construction and maintenance machines and vehicles. [19]

Sizing

The dimensions of the system should be calculated by maximum capacity and a good way to do so is using the value of “inhabitant equivalent”, which relates to the house’s number of rooms and not to the number of inhabitants. In this model, each room of the house = inhabitant equivalent (2 to 4m²). [20]

Plants

To choose what species should be used, a few criteria need to be taken into consideration such as main pollutants to be removed; climatic conditions and local availability of species. They can be emergent, fluctuant or submerged species (see fig. 01). [21]

In Europe, the common reed (Phragmites communis) is one of the main wetland plant species used for water treatment, especially on subsurface flow filters. Some examples are Caltha palustris,Veronica beccabunga and the Typha latifolia.


fig. 7: Phragmites communis, Caltha palustris,Veronica beccabunga and Typha latifolia, respectively.

When the water goes through a pretreatment basin, the plants in the filter basin can be less resistant. Some examples are the Sparganium erectum, Alisma plantago and Iris pseudacorus. [22] Before mixing different species in the same basin, research about possible interactions between the species and if there is competition between them.


fig. 8: Sparganium erectum,Baldellia ranunculoides and Iris pseudacorus, respectively.

It’s advisable to transplant seedlings of plants that have been removed from a nearby location, which are naturally more adapted to the local climate and to do so in the rainy season, in order to minimise conditions of hydric stress for the plants. Plant the botanical species between 20 to 30 days before starting the purification system so there’s time for biological adaptation of the plants to the new environment.

Considering phyto purification

Phyto purification systems are economically efficient solutions. It is estimated that however the initial cost can be elevated (6.500 euros on the hybrid solution by Kevin Quendric, for example), these water treatment systems pay for themselves in about fifteen years time as they do not require electric energy nor maintenance by a qualified workforce.

Unlike conventional purification systems, phyto purification can support insects, birds, amphibians, contributing to the local biodiversity. The lack of chemicals makes the system an environmentally-friendly option available for water treatment.

In addition to environmental and economic upsides, planted filters can be a beautiful landscape project as it has an undeniable aesthetic value. A symbiotic relationship can emerge. The wastewater produced every day by humans is rich in nutrients valuable for certain plants of every shape and colour.

[1] Dias, Richardsson Mendes. (2019) Eficiência da Fitodepuração como Alternativa de Tratamento de Águas Residuárias: Um Estudo de Caso. Teresina:  IFPI

[2]https://www.build-green.fr/phytoepuration-creer-un-filtre-plante/doing_wp_cron=1617567011.8170158863067626953125, accessed 4 April, 2021.

[3] Ibidem

[4] https://wiki.lowtechlab.org/wiki/Phyto%C3%A9puration_eaux_us%C3%A9es, accessed 5 April, 2021.

[5] https://www.lenntech.com/phytodepuration.htm, accessed 5 April, 2021.

[6] http://www.graia.eu/en/our-activities/phytodepuration-and-lagooning/, accessed 5 April, 2021.

[7]https://www.build-green.fr/phytoepuration-creer-un-filtre-plante/?doing_wp_cron=161756 7011.8170158863067626953125, accessed 6 April, 2021.

[8] Ibidem

[9]https://www.researchgate.net/publication/326352770_Manual_de_sistemas_de_Wetlands_construidas_para_o_tratamento_de_esgotos_sanitario_implantacao_operacao_e_manutencao, accessed 6 April, 2021.

[10] Ibidem

[11] Ibidem

[12]https://www.build-green.fr/phytoepuration-creer-un-filtre-plante/?doing_wp_cron=1617567011.8170158863067626953125 , accessed 8 April, 2021.

[13]https://www.researchgate.net/publication/326352770_Manual_de_sistemas_de_Wetlands_construidas_para_o_tratamento_de_esgotos_sanitario_implantacao_operacao_e_manutencao, accessed 8 April, 2021.

[14] https://wiki.lowtechlab.org/wiki/Phyto%C3%A9puration_eaux_us%C3%A9es, accessed 8 April, 2021.

[15] Ibidem

[16]https://www.sciencedirect.com/topics/earth-and-planetary-sciences/water-purification-plant, accessed 9 April, 2021.

[17]https://www.build-green.fr/phytoepuration-creer-un-filtre-plante/?doing_wp_cron=1617567011.8170158863067626953125, accessed 9 April, 2021.

[18] https://www.sciencedirect.com/topics/earth-and-planetary-sciences/water-purification-plant, , accessed 11 April, 2021.

[19https://wiki.lowtechlab.org/wiki/Phyto%C3%A9puration_eaux_us%C3%A9es, accessed 11 April, 2021.

[20] Ibidem

[21] https://www.researchgate.net/publication/326352770_Manual_de_sistemas_de_Wetlands_construidas_para_o_tratamento_de_esgotos_sanitario_implantacao_operacao_e_manutencao, accessed 11 April, 2021.

The post Phytodepuration with Degre.47 first appeared on Critical Concrete.
Did you miss our previous article…
https://www.akbarconcreteworks.com/?p=202

Knowing Our Food: Scraps

Knowing Our Food: Scraps

Picture the last food scrap you threw away. Maybe you were dumping some potato peels in the trash, or composting the outer leaves of a cauliflower. Why did you throw it away? Was it for aesthetic reasons? Did you consider any of that food inedible? Did you have patience in that moment to think of a reason to keep it? Were you out of containers to store it in? There are a multitude of reasons why food ends up in the bin, but we hope this article can make it easier to give your food (waste) another chance.

Food waste, as we’ve explored in this series on food knowledge, is one of the most urgent yet avoidable contributors to climate change. Even a single apple that goes to waste due to poor storage strategies or aesthetic imperfections represents a loss of all its embodied energy. That is to say, all the water and land used to grow it, all the energy used to transport and store it, and all of the caloric energy it could have provided to someone are squandered. At such a small scale, it’s negligible, and yet when everyone believes that throwing away food is not a big deal, it leads to enormous quantities of waste that often end up in landfills, releasing methane (a potent greenhouse gas) into the atmosphere.

Reframing Fruit Scraps

One way to reduce food waste is to rethink what you consider food. Of course, this isn’t to say that you should go around eating nut shells and parts of food that leave you with indigestion, but some foods that we are taught to discard have great flavors and health benefits.

On the most basic level, this applies to fruits with soft peels. Your apple, pear, peach, or nectarine skins can and should be eaten, but certain dessert recipes ask you to peel them, and in those cases, you can enjoy the peel by itself or use it in tea. Beyond those four, kiwi skin adds fiber and flavor when you eat it with the rest of the fruit, and dried pomegranate and hazelnut skin can be pulverized and added to smoothies or sprinkled on meals as a supplement. But fruit scraps don’t just have to be healthy; we highly recommend making treats out of your lemon and orange rinds. Although candied citrus rinds are great dipped in chocolate or sprinkled on cakes, the ones we made were devoured before they could make it to those stages.

More unusually, banana skins make a wonderful meat substitute in some recipes, like tacos or lasagna. Watermelon rinds make good pickles, but they can also be candied by cooking them in sugar syrup. If you make your own milk alternatives at home, you can use the strained almond, oat, rice, or cashew pulp for baking by replacing some of the flour in a recipe with pulp. (Be aware that milk pulp as a flour replacement will have an effect on the moisture and gluten content, so it only works in small ratios of pulp to flour and doesn’t work for difficult pastries, like croissants.) Another unusual recipe we tried was jam made out of passion fruit rinds. By boiling the rinds, taking the skin off, and mashing them with sugar, we cooked a slightly floral and astringent spread that goes well with bread or scones.

Vegetable Scrap Recipes

It’s helpful to rethink how you treat the scraps from your vegetables, too. Make sure not to waste delicious broccoli stalks or beet greens, and definitely don’t throw out the peels of your root vegetables. When a recipe requires peeled potatoes, the peels make a crispy snack or garnish when baked with some oil. Carrot greens transform into a delicious pesto when blended with oil, garlic, sunflower seeds, and salt.

Anything hard to chew can be blended into sauces, as is the case with kale stems and pea shells, and the stems of chard can be pickled. You can even sauté the tough green ends of leeks! The leaves of cauliflower, broccoli or romanesco broccoli should be cooked and eaten as well. Fava pods can be eaten whole, by grilling or sautéing them. When we tried out this recipe, we topped the pods with lemon juice, salt, chili flakes, and mint.

It should go without mentioning that any vegetable scraps can be made into broth. Herb stems are superb for this purpose, but celery, onions, leeks, carrots, potatoes, and celery root all provide scraps to flavor your broth. Sometimes, there isn’t enough waste to produce broth, so these scraps can be stored in the freezer while you collect enough.

Similarly to broth, parts of some foods can be added to teas or infused on their own. This is most true for leaves, especially artichoke, persimmon, and strawberry leaves, and for dried or fresh citrus rind.

Other Food Scrap Uses

Food scraps have purposes beyond just culinary! When making a vinegar-based cleaning solution for your house, lemon, orange and grapefruit rinds add a nice aroma. Banana skins serve as aphid repellents when they are chopped up and buried a couple inches deep around the base of a plant, and have anti-inflammatory properties when used on irritated skin. Coffee grounds and oat, almond and rice milk pulp are great body exfoliants, with rice and oat pulp having additional soothing properties when used on facial skin.

Many food scraps can be used to regrow foods, and these experiments double as educational projects as well. Root vegetables can be regrown by placing the tops of the root in water until new leaves begin to grow, at which point they can be planted in soil. Ginger pieces the size of an inch can be planted directly, and in very little time they will grow more ginger. Long, green vegetables such as celery, lemongrass, leeks, and green onions can be regrown by placing one inch of the bottom part of the plant (not counting the length of the roots) in a tray or glass of water until it begins to grow again. They can then be planted in soil. Leafy vegetables such as lettuce or endives undergo a similar process: the bottom parts are placed in water for several days or a few weeks until there is new growth and they can be moved to soil.

Scrap Dyes

We’ve saved the most exciting use for last: dyes! Many fruit and vegetable skins have tannins that help dyes bond well to natural fibers like cotton, linen, wool, or silk. The most well-known dyes made from food scraps are onion skins and avocado pits and skins. Yellow onion skins make yellow and orange dyes, red onion skins create colors between light lilac and deep magenta, and avocado scraps make a pink dye.

These dyes can be made stronger with alum powder, a mordant which helps dyes adhere to fabric better, but they can be used without it as well because of the presence of tannins in these food scraps. Some natural dyes, like the brown colors from chestnut and walnut shells, are vastly improved with the use of a mordant. Pomegranate rinds make a yellow dye and the leaves from loquat trees make a pink dye, both of which work best using a mordant.

Scraps in the Big Picture

Sometimes the scraps from your food just can’t be eaten or used, and that’s okay! When you get to this point, what’s most important is diverting your food waste from the landfill. If your city has a municipal composting program, you may have curbside compost pickup which is an easy way to reduce the emissions of your food waste, but you can also easily set up a compost in your own backyard, or get a small vermicomposting bin for your kitchen. Food waste can also be used to feed a biodigester, which produces biogas that you can use for energy. Both composts and biodigesters are part of our ongoing research at our production center, so you can expect an article soon about the merits and challenges of these systems in an urban setting. And lastly, if you do not have access to municipal or domestic compost where you live, you can see if any farmer’s markets or local gardens collect compost, and bring your food waste to them on a weekly basis.

When it comes to food, there are so many systemic and cultural barriers to consuming it mindfully and avoiding waste. Overcoming preconceptions about food scraps that are seen as non-food is one part of working against these entrenched cultural beliefs that promote excessive waste. The problem, like any environmental issue, does not come down to just personal choices, but when these small changes are implemented at a wide scale, they can have significant effects, not just in the amount of food that goes to waste, but towards treating the food we have with respect. When we stop taking food for granted, we respect the seasonality of our produce, and stop letting vegetables go bad due to poor storage. You can read about these two related practices in the previous articles of our Knowing Our Food trilogy, and learn about how to preserve food for long or short periods.

The post Knowing Our Food: Scraps first appeared on Critical Concrete.

Knowing our Food: Preservation

Knowing our Food: Preservation

If you are interested in our kimchi making process, click here to skip to the section about kimchi directly.

Do you ever stop to think about how you’re able to enjoy fresh strawberries, blueberries, and peaches in Winter? Contemporary food systems make an enormous variety of food available at any time of year. Produce travels long distances to be sold where it isn’t in season, undermining the business of small farms and emitting greenhouse gases. Local foods are riper at harvest because of shorter travel times, and choosing to buy local also supports the local economy. But even while shopping local, unseasonal food can be harmful to the environment; energy-intensive food production methods like greenhouses can produce 3-10 times the emissions as imported foods.[1]

Understanding why our food goes bad and what accelerates its decay helps reduce food waste, but fridges are only good at storing fresh produce for relatively short periods. There is a wide range of alternatives to fridge storage that keep fruits and vegetables from rotting for months or even years. This article will detail some long-term storage methods and their benefits depending on region and culinary purposes, and we will take you through our process of fermenting cabbage for kimchi.

When you decide to cut down the carbon emissions of your food, the produce available to you changes seasonally. The good news is that there are ways to store these foods for long periods so that you can still eat and cook with foods after their peak seasons. Alternatives to refrigerating food have existed throughout history, but the availability and convenience of the fridge has brought some of these practices out of the mainstream.

The two categories of traditional, low-tech food preservation are storing food in containers that control temperature and humidity, or preparing food to slow down its decay. 

Storage Methods for Food Preservation

It is important to note that food storage differs in summer and winter because different variables cause food decay in each season. Traditional food storage containers address the needs of produce through passive strategies that make use of the climate.


Zeer Pot

In hot and dry climates, natural fridges make use of evaporative cooling on the outer surface of a clay pot. In this method known as the Zeer Pot, water evaporation converts sensible heat to latent heat. This means that energy is released when liquid water is converted to vapor, reducing the temperature inside the container. The method uses two clay pots, one inside of the other. Between the pots is a layer of sand into which water is poured to begin the evaporative cooling process. Evaporation is continuous, ensuring that the natural fridge stays cool all day, but it relies on an outside temperature hot and dry enough to cause evaporation. Because the Zeer Pot serves the function of a fridge, it does not extend the life of food or preserve it any longer than a fridge, but it is necessary to mention when discussing how to store food without refrigerators or freezers. 


Root clamp using upcycled container

In cool climates and during the Winter months, some vegetables can stay fresh for longer by taking advantage of a steady temperature underground. Root vegetables can avoid frost by being buried, as ground temperatures fluctuate significantly less per day and can stay warmer than the winter air temperature.

Burying vegetables (and some fruits) can be done through covering the planted vegetables with soil or straw, or through harvesting the vegetables and putting them in small underground holes called clamps or silos.[2] Underground food cellars, when available, serve the same purpose. Given that a majority of the world population lives in urban areas, the first option is not as accessible, as it relies on growing your own food in large quantities. The last option, an underground root cellar, is useful for larger quantities of foods and can also be used to extend the shelf life of more than just fruits and vegetables.


Root Cellar

The most accessible of the three ways of burying vegetables is the “clamp” or pits that are completely or partially buried. These can be built relatively quickly using very little garden space and can upcycle used household items (such as washers or steamers). Proper care must be taken to ventilate to avoid mold and to protect the food from rodents or other pests. For protection against rodents, the trench can be lined with rust-resistant metal mesh, which simultaneously aids ventilation. Another method to strengthen ventilation is to place a bundle of twigs in the center of the pit to act as an air shaft. The old drums of washing machines are perforated, which makes them perfect pest protection, but bricks can also be used for the walls and ground of the pit as well. To protect against rain, a plastic sheet can be used to cover the pit, although there may be a problem if the soil around the vegetables becomes extremely saturated from heavy rainfall. 


Root Clamp

Sand storage is helpful to use in tandem with other cold storage methods because it regulates moisture conditions. It can be done at multiple scales, so in large boxes in a root cellar, in a root clamp or food pit, or even at the bottom of your fridge drawer, and it works with all root vegetables, onions, leeks, shallots, and cauliflower.[3] Sand storage entails pouring sand into a container and then submerging the vegetables completely.[4] The sand serves the purpose of a humidity regulator, removing excess moisture, so vegetables cannot be washed before they are stored in this way.[5] Sand storage requires that there be space for ventilation between the vegetables being stored, and the sand container should stay out of heated rooms or areas that are below freezing.[6] If you do not have a food pit, cellar, or food clamp, you can use this method on its own if you have a cold enough garage or, as mentioned above, in the bottom of your fridge drawer.[7]

Preservation Through Food Preparation

Drying


Drying food using a dehydrator, an oven, and the sun

Drying is a method best used for fruit, mushrooms and herbs. It is more easily done during summer because there is more heat and more fruit available to dry, but in the winter, citrus and fungi can be dried in the oven which helps heat the house. Vegetables can also be dried, but they should be blanched, or boiled quickly, before drying, which removes some healthy enzymes.[8] Dried foods retain most of their vitamins, except vitamin C, which degrades quickly.

Foods can be dried in the sun, in an oven, or in a dehydrator, making sure to allow sufficient space for ventilation. The process of drying takes several hours, but it is very hands-off, as most of the work involved is preparing the food by slicing it and putting it on drying trays. When using the oven, care should be taken to set a low enough temperature to avoid burning. Dried fruit is a delicious snack and can be added to baked goods for its flavor and texture. Mushrooms and herbs are multipurpose when dried, and just like dried herbs, mushrooms can be ground to produce a delicious seasoning powder for any meal.

Fermenting

Fermented foods preserve well because the acidic environment blocks bacteria from multiplying. Lactic fermentation is the process in which lactic microbial organisms convert sugars into lactic acid, creating an acidic environment that inhibits bacterial growth.[9] It is best known for making sauerkraut and other cabbage dishes, like kimchi and Salvadorian curtido. Usually the process is to cut vegetables, season them, and leave them in their own juices to ferment for a few days or a few weeks. Then, jars are stored in a cool place—either in a cellar or fridge—and last a year or more. At room temperature, sauerkraut lasts up to a few months,[10] but kimchi will only last about a week if left out.[11] Lactic fermentation allows more raw vegetables to be eaten throughout the year without relying on food travelling long distances. When eaten uncooked, fermented foods preserve their enzyme and vitamin content while adding healthy probiotics.[12] Fermentation adds acidity and a distinct fermented flavor.[13]

Canning and Salting

Canning relies on heat to kill both bacteria and enzymes.[14] Canned food is prepared by placing food in sterilized jars, then boiling the closed jars of food for several minutes to stop factors that cause decay, so the food stays edible almost indefinitely.[15] Canning is an easy process that is helpful for storing foods that will be cooked anyway. However, if we relied on canning to preserve all our food, we would miss out on beneficial enzymes and vitamins.

Salting protects food from the multiplication of bacteria because salt draws the moisture out, creating an inhospitable environment.[16] Often, salted food is rinsed before it is used for cooking, which reduces the sodium but, unfortunately, removes some of the nutritional value from water-soluble vitamins.[17] To work around this disadvantage, salting is best used if the preserved food is intended to be cooked with a high amount of salt, such as in broth, or simply consumed in small quantities.[18]

Our Approach

Every method for storing food in the long-term has specific conditions for which it is ideal. At Critical Concrete, we implemented some of these strategies according to the conditions in Porto.

Local climate is a necessary component of food storage strategies. In the case of Zeer Pots, low humidity is essential to ensure evaporation. As Porto is relatively humid even in the summer, evaporative fridges are not appropriate for keeping food cool in this area. On the other hand, burying produce is optimal in a cool and dry climate.[19] It can even be effective in places that receive snow, as long as certain precautions are taken against moisture.[20] Food preparation for preservation often lasts six months or more. Fermented foods last longer when stored away from sunlight and direct heat, while dried foods need to be stored in a dry environment, such as in dry bags or jars.


Pouring water in the sand layer of our natural fridge to trigger evaporation

In the Summer of 2019 we attempted to build a natural fridge. However, the temperatures inside were not cold enough to store food; on the hottest day, the fridge was 17 degrees, and on cooler days the temperature inside was 13 at the lowest. This is quite logical given Porto’s humid climate, which resulted in less evaporation, and on the warmest day we recorded temperatures, it was only 21 degrees outside. Our unfortunate results emphasize the need for attention to specific climate in storage methods for food preservation.

Kimchi

To look into food preparation methods for long-term storage, we attempted lactic fermentation, using a recipe for vegan kimchi available on the blog Maangchi.com.

We compressed it into the jars to avoid air bubbles. After 5 days fermenting at room temperature, we placed the delicious kimchi in the fridge. (Normally, fermentation at room temperature only occurs for 1-2 days, but we stored it in a very cold unheated room.)

In these before and after images, we can see the evidence of fermentation: there are dozens of air bubbles where, prior to fermentation, we could only see a few. The difference in hue is only due to the artificial lighting used in the first image, however the cabbage is slightly more translucent after fermentation.

Our kimchi turned out wonderfully, but we noticed a few things in the process of making it. First is that it is not shelf stable, relying on the refrigerator to extend the lifetime past a week. (When we build a cool cellar in the Critical Concrete kitchen, the kimchi can be moved there to limit reliance on the fridge.) Secondly, when getting the cabbage ready to ferment, we noticed that the wider jar made it easier (than two other small jars we filled) to pack kimchi without allowing bubbles. Third of all, though slightly minor, is that when preparing kimchi, it is necessary to soak cabbage in brine and then rinse several times to remove the salt. This has the same caveat as preserving food with salt: losing water-soluble nutrients from rinsing. That being said, kimchi makes up for any lost nutrients in probiotics and flavor, and can last more than a year when stored correctly.

Conclusion

When used in the relatively humid summers of Porto, the Zeer Pot technique offered little relief from the hot outside temperatures. In drier climates, it could be a simple and low tech way to expand cold storage or, even better when possible, reduce the need for a fridge. During the winter, burying food is a great way to extend the life of vegetables, although, as mentioned, the reality of urban living makes it difficult to accomplish in many homes. If it is an option, there are many traditional ways to go about it, but each one needs to carefully protect against moisture, cold, and pests.

How to store food outside of the fridge

Salting and canning are two simple methods of food preservation that are perfect for certain dishes, but both affect the nutrient content of food significantly. Dried food offers a wide variety of purposes: in baked goods, as snacks, or as seasoning. As most homes have an oven, it is quite accessible. During the summer it is more energy efficient, but, on the other hand, can help heat your home in winter. The process of fermenting requires very little energy expenditure and can be used for a wide variety of produce, but it is especially suited for vegetables. In fact, as drying can be better for fruits and fungi, and fermenting is great for vegetables, these two methods of preservation complement each other. Although fermentation alters the flavor of raw foods, this can be a benefit. In the case of our homemade kimchi, fermentation was a success. However, it failed to reduce our reliance on the fridge, while still posing some of the problems of salt-preserved food.

Our food culture is built around having every variety of food available constantly, without inspiring consumers to consider where and how that food is produced. There are often significant challenges to eating local, seasonal food, and, at the same time, it won’t solve the world’s problems to only eat such food. However, eating seasonal food when possible leads to more delicious, nutritious meals and helps the environment simultaneously. 

Stay tuned for our next food article in the series, on the use of food scraps.

Sources

[1] Ritchie, Hannah. “You Want to Reduce the Carbon Footprint of Your Food? Focus on What You Eat, Not Whether Your Food Is Local.” Our World in Data, Global Change Data Lab, 24 Jan. 2020, ourworldindata.org/food-choice-vs-eating-local. 

[2] Preserving Food without Freezing or Canning: Traditional Techniques Using Salt, Oil, Sugar, Alcohol, Vinegar, Drying, Cold Storage, and Lactic Fermentation. Chelsea Green Pub., 2007. 

[3] https://www.gardeningknowhow.com/edible/vegetables/vgen/storing-root-crops-in-sand.htm#:~:text=Root%20veggies%20that%20grow%20vertically,to%20entombing%20them%20in%20sand. accessed 18 February, 2021.

[4] https://www.gardeningknowhow.com/edible/vegetables/vgen/storing-root-crops-in-sand.htm#:~:text=Root%20veggies%20that%20grow%20vertically,to%20entombing%20them%20in%20sand. accessed 18 February, 2021.

[5] https://www.gardeningknowhow.com/edible/vegetables/vgen/storing-root-crops-in-sand.htm#:~:text=Root%20veggies%20that%20grow%20vertically,to%20entombing%20them%20in%20sand. accessed 18 February, 2021.

[6] https://www.gardeningknowhow.com/edible/vegetables/vgen/storing-root-crops-in-sand.htm#:~:text=Root%20veggies%20that%20grow%20vertically,to%20entombing%20them%20in%20sand. accessed 18 February, 2021.

[7] https://www.gardeningknowhow.com/edible/vegetables/vgen/storing-root-crops-in-sand.htm#:~:text=Root%20veggies%20that%20grow%20vertically,to%20entombing%20them%20in%20sand. accessed 18 February, 2021.

[8] Preserving Food without Freezing or Canning: Traditional Techniques Using Salt, Oil, Sugar, Alcohol, Vinegar, Drying, Cold Storage, and Lactic Fermentation. Chelsea Green Pub., 2007. 

[9] Preserving Food without Freezing or Canning: Traditional Techniques Using Salt, Oil, Sugar, Alcohol, Vinegar, Drying, Cold Storage, and Lactic Fermentation. Chelsea Green Pub., 2007. 

[10] https://growyourpantry.com/blogs/fermenting-pickling-preserving/how-long-does-sauerkraut-last, accessed 18/01/21.

[11] https://www.healthline.com/nutrition/does-kimchi-go-bad#shelf-life, accessed 18/01/21.

[12]Preserving Food without Freezing or Canning: Traditional Techniques Using Salt, Oil, Sugar, Alcohol, Vinegar, Drying, Cold Storage, and Lactic Fermentation. Chelsea Green Pub., 2007. 

[13] Preserving Food without Freezing or Canning: Traditional Techniques Using Salt, Oil, Sugar, Alcohol, Vinegar, Drying, Cold Storage, and Lactic Fermentation. Chelsea Green Pub., 2007. 

[14] Seymour, John. The Self-Sufficient Gardener: A Complete Guide to Growing and Preserving All Your Own Food. Dolphin, 1980. 

[15] Seymour, John. The Self-Sufficient Gardener: A Complete Guide to Growing and Preserving All Your Own Food. Dolphin, 1980. 

[16] Preserving Food without Freezing or Canning: Traditional Techniques Using Salt, Oil, Sugar, Alcohol, Vinegar, Drying, Cold Storage, and Lactic Fermentation. Chelsea Green Pub., 2007. 

[17] Preserving Food without Freezing or Canning: Traditional Techniques Using Salt, Oil, Sugar, Alcohol, Vinegar, Drying, Cold Storage, and Lactic Fermentation. Chelsea Green Pub., 2007. 

[18] Preserving Food without Freezing or Canning: Traditional Techniques Using Salt, Oil, Sugar, Alcohol, Vinegar, Drying, Cold Storage, and Lactic Fermentation. Chelsea Green Pub., 2007. 

[19] Preserving Food without Freezing or Canning: Traditional Techniques Using Salt, Oil, Sugar, Alcohol, Vinegar, Drying, Cold Storage, and Lactic Fermentation. Chelsea Green Pub., 2007. 

[20] Preserving Food without Freezing or Canning: Traditional Techniques Using Salt, Oil, Sugar, Alcohol, Vinegar, Drying, Cold Storage, and Lactic Fermentation. Chelsea Green Pub., 2007. 

The post Knowing our Food: Preservation first appeared on Critical Concrete.

Knowing Our Food: Storage

Knowing Our Food: Storage

Though food nourishes us every day, there is still much that we can learn about it. At Critical Concrete, we aim to consume as much local, seasonal food as possible and we have recently started growing it ourselves in our food forest. Unfortunately, it is quite common that we as a society eat food without paying attention to its seasonal availability; it is easy to be influenced by a globalized system that makes practically any food available at any time in the year regardless of climate and the environmental impact. The production of food outside of its peak season can have 3-10 times the emissions as food imported from better climates, so it is important to not only support local farmers, but also to mind the seasonality of fruits and vegetables.[1] While some imported foods, such as almonds and avocados, are imported by boat and have a lower footprint than locally produced options, other more perishable foods are freighted by air, which creates 50 times the carbon emissions as boat transportation.[2] Aside from environmental friendliness, seasonal, local food can be more nutritious and flavorful as it has more time to ripen before harvest, and supports small farms and sustainable farming practices.

That being said, choosing local and seasonal produce means nothing if our food goes bad before we have the chance to eat it. That means that storing food to extend its lifespan is highly important. This research grew out of our curiosity to know more about alternative ways of storing food that are not energy consuming. However, as we encountered more information, the research evolved to focus more on food knowledge, with the aim of informing ourselves and our readers about the needs of our fruits and vegetables and how we can store and consume them. Our upcoming articles from this research will delve into the topics long-term storage, food production, and the use of food scraps, and in this article, we will discuss how to make use of conventional kitchen storage to keep food fresh. 

Food Waste and the Fridge

Food waste is an immense problem that worsens each year. In fact, fighting food waste has been determined to be one of the most urgent solutions to fighting climate change.[3] The production and disposal of wasted food results in water waste, land waste and deforestation, and greenhouse gas emissions. Although a tremendous amount of food waste is the result of industrial food practices, in Europe 42% of food is thrown out by the consumer, and only one third of that food wasted consists of inedible residuals (skin, shells, peels).[4] Regardless of whether climate change can be tackled through individual actions, consumers can still reduce the amount of food lost to spoilage in their own homes. Even if it does not solve environmental issues in and of itself, when we learn about proper food storage and reduce our waste, we save money and take the first steps toward better societal food practices.

At first we were inclined to look for alternatives to our usual house appliances like the fridges, as refrigerants like chlorofluorocarbons (CFCs) are the main cause of the depletion of the ozone layer.[5] This led us to a few methods of long-term storage, which we built as prototypes to evaluate their efficacy in the climate our research lab is located in. Keep an eye out for our next article, detailing these methods and their benefits for different foods and environments.

However, it can’t be ignored that storing food in the fridge and freezer is such common practice, so this article will describe the ways to reduce food waste in the context of conventional storage practices. Thus we first have to analyse the way the fridge is used, to know its strong and weak points and the way it works. Additionally, it is crucial to understand the process of food decay and the science behind it. Once it is understood how food decays, the same principles can be applied everywhere. In order to reach a balance in the system, minimizing waste and prolonging the life of food, we must first know the needs of fruits and vegetables and demystify their storage environments, both artificial and natural.


Where to store different fruits and vegetables

Food Decay

Knowledge about everyday storage of fruits and vegetables is essential. In order to better understand the proper storage of fresh vegetables and fruits, the first step is to clarify the biochemical characteristics and processes which occur after harvesting. This knowledge can help reveal why certain foods become rotten very fast whereas other foods last for a long time. This phenomenon is influenced by two factors: the speed of natural metabolism depending on the specific plant and the way it is stored. 

Enzymes are proteins which serve as catalysts to chemical changes in living organisms and there are thousands of different enzymes with varying functions. Enzymes in our food cause changes to fruit and vegetables which cause them to spoil. In cool temperatures, these enzymes slow their activity, and they can die when cooked above 60 degrees.[6] 

Aside from enzymes, three other rotting agents can reduce the life of food. These are mold, which is visible, yeasts, which convert sugars into alcohol through fermentation, and bacteria, some of which can poison food.[7] Using this information, we can determine how to avoid mold and bacteria, and slow down the process of decay.

Conditions for storage

The best storage method for a given food depends primarily on three parameters: temperature, humidity and ripening.

Temperature: Cooling down slows down the metabolic process and thus has an immense effect on preservation. Nevertheless, there are certain plants, such as bananas, tomatoes, eggplants or cucumber which are very sensitive to the cold and also others which lose vitamins and taste.[8] Moreover you should take into consideration where in the refrigerator to put things. The middle and the back are usually colder than the other areas of the fridge.[9] As there is no cooling on the bottom cold air coming from the middle can warm up and rise up which leads to the different temperatures levels.[10] 


Zones of the fridge and their temperatures

Humidity: Many fruits and vegetables, such as cucumbers, leafy greens, carrots and roots, are susceptible to humidity loss and shriveling.[11] For these, it is important to ensure a high level of atmospheric humidity. Many refrigerators have a crisper drawer for vegetables in order to keep a higher level of humidity. Some vegetables that should definitely be stored in the crisper drawer are spring onions, celery root, spinach, and leeks.[12] Otherwise, vegetables that are susceptible to moisture loss can be wrapped in damp towels and stored in other areas of the fridge.

Ripening: In basic terms, ripening can divide produce into two groups: the kind that continues the process of ripening after the harvest and the kind which abruptly stop ripening when harvested. This fact depends on the natural plant hormone ethylene. Ethylene is a gaseous hydrocarbon (C₂H₄) which speeds up the ripening process.[13] Some fruits and vegetables release ethylene gas in the process of becoming ripe.[14] Others, by contrast, are sensitive to ethylene and absorb it.[15] If you do not want to speed up the ripening and  spoiling effect, try to store ethylene-sensitive vegetables apart from those which release a lot of ethylene. 


Ethylene production and sensitivity in fruits and vegetables

According to their ethylene production, apples, tomatoes, peaches, apricots, avocados, kiwi, mango and bananas should be stored apart from other fruits and vegetables.[16] But you can also make use of this property when you want something to ripen faster. In that case, you purposefully store high ethylene producers together with ethylene sensitive ones.[17] When you have green tomatoes you can store them together with apples in order to get them to ripen faster.      

Referring to proper storage, there are some rules of thumb about food that should never be stored in the refrigerator. Fruits sensitive to cold are pineapples, avocados, bananas, mandarins, mango and melons.[18] Vegetables sensitive to cold are artichokes, tomatoes, potatoes, eggplants, garlic and onions.[19] Nevertheless, there are some real divas who cannot really decide whether they want to be stored in the fridge or in the room. Cucumbers and zucchinis for example are sensitive to cold but if too warm they lose humidity and start to shrivel fast.[19] Therefore, they should be stored in the crisper drawer or in the top part of the refrigerator, wrapped in a damp towel to avoid cold damage and humidity loss.[20]        

Additional Specific Storage Strategies 

With this knowledge of general food storage, we can delve into more specific ways to increase the lifespan of our fruits and vegetables. Berries and cherries are susceptible to mold, so they should not be washed until just before they are eaten.[21] Also, berries are often quite fragile and should be stored in a single layer, if possible.[22] Figs are sensitive to humidity, which makes paper bags good storage containers to absorb their excess moisture, but they can also be stored on plates in the fridge.[23]

As for vegetables, removing rubber bands from the stems is always the first step.[24] Radishes, beets, carrots, and turnips, should be separated from their greens to avoid losing moisture in the roots.[25] Then, the roots can be stored in an open container with a wet towel placed on top.[26] Greens are best in closed containers alongside a damp cloth to keep them from drying.[27] However, you can save room in the fridge by storing kale, chard, and collard greens upright in glasses of water on the counter.[28] Celery and fennel can be stored this way as well.[29] Asparagus is best stored upright in a water inside the fridge.[30] It should be noted that using paper bags, reusable containers, glasses, or damp cloths should make it easy to eliminate the need for any single-use plastic inside the fridge.

Conclusion      

Hopefully, being more cognisant of the needs of fruits and vegetables can limit food ending up in the trash or compost. Now that we understand how the chemical processes happening inside fruits and vegetables cause them to react to different conditions, we can store it in the right way. We can take advantage of the different areas inside your fridge, and organize our fridges to maximize the lifespan of our food. To help adjust to all this new information, we produced a chart to help understand fruits and vegetables and store them in the best way possible. Download it, print it, and put it on the wall in your kitchen! 

In our next article about food we will discuss different ways to store food for longer periods of time and the benefits of each method. Stay tuned to learn how fruits and vegetables can be enjoyed past the periods when they are in season, without forfeiting the nutritional value and flavor of eating seasonal food.

VIEW AND SAVE OUR GUIDE

Bibliography:

[1] https://ourworldindata.org/food-choice-vs-eating-local, opened 8.12.2020.

[2] Ibid.

[3] Hawken, Paul. Drawdown: The Most Comprehensive Plan Ever Proposed to Reverse Global Warming. New York, New York: Penguin Books, 2017.

[4] Principato, Ludovica. Food Waste at Consumer Level a Comprehensive Literature Review. Springer International Publishing, 2018. p. 5.

[5] https://www.conserve-energy-future.com/causes-and-effects-of-ozone-hole.php, opened 8th of December, 2020.

[6] Seymour, John. The Self-Sufficient Gardener: A Complete Guide to Growing and Preserving All Your Own Food. Dolphin Books, 1980. 

[7] Ibid.

[8] https://www.rollende-gemuesekiste.de/wp-content/uploads/Lagertipps.pdf, opened 24.11.2020.

[9] Ibid.

[10] Ibid.

[11] 

[12]https://myplasticfreelife.com/wp-content/uploads/images/Berkeley%20Farmers%20Market%20Tips%20for%20Storing%20Produce.pdf, opened 27.11.2020.

[13] https://www.theproducenerd.com/2018/02/what-is-ethylene-how-is-it-used/, opened 10.12.2020 December

[14] Ibid.

[15] Ibid.

[16] Sächsische Landesanstalt für Landwirtschaft. Verbraucherinformationen Obst Und Gemüse Richtig Lagern, 2003.

[17] https://www.rollende-gemuesekiste.de/wp-content/uploads/Lagertipps.pdf 

[18]https://myplasticfreelife.com/wp-content/uploads/images/Berkeley%20Farmers%20Market%20Tips%20for%20Storing%20Produce.pdf, opened 27.11.2020.

[19] Ibid.

[20] Ibid.

[21] Ibid.

[22] Ibid.

[23] Ibid.

[24] Ibid.

[25] Ibid.

[26] Ibid.

[27] Ibid.

[29] Ibid.

[30] Ibid.

The post Knowing Our Food: Storage first appeared on Critical Concrete.
Did you miss our previous article…
https://www.akbarconcreteworks.com/?p=176

The reality of concrete

The reality of concrete

Looking for an alternative, sustainable way of practicing architecture? Apply now for our Postgraduate!

Concrete, as the most used building material worldwide has a huge impact on our cities, societies and environment. Much of our research is based on the idea to create an alternative solution for conventional methods of building, such as building with concrete. In this article, we will tackle basic and relevant knowledge and information about concrete, to understand why it is important to think about alternative solutions for the future of our building habits. This write-up will be part of a series of small papers related to meaningful knowledge, to understand why it’s urgent to rethink our conventional building approaches.

Concrete, cement & mortar – definitions

To give a brief overview of what we are talking about in specific, we will first define the most important terminologies that we will need to understand the whole topic around concrete.
Four important terms you should know about and understand their exact definitions:

Diagram showing the composition of concrete
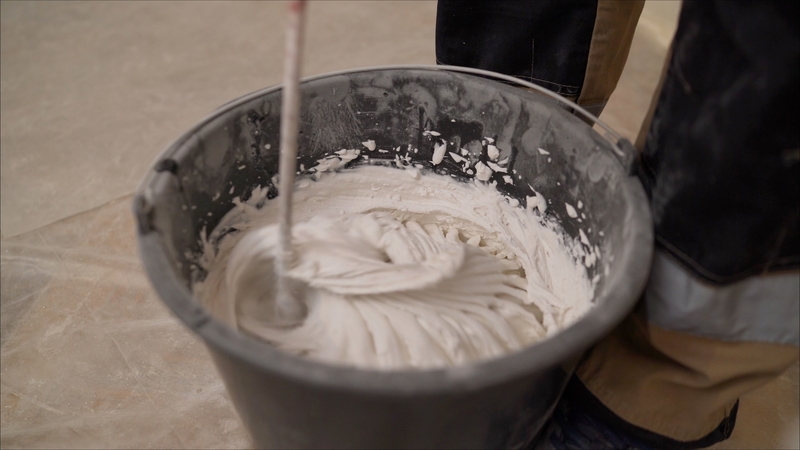
Typical composition of concrete

cement  // səˈment

Cement is the key ingredient to mix concrete. This product is mainly made out of crushed limestone mixed with shales and slates, shredded to a fine powder and heated up to approximately 1450°C. The heat causes a chemical reaction, also known as calcination.[1] That reaction along with the heating process causes a high amount of carbon-dioxide emissions, which makes cement production a big driver of greenhouse gas emissions. The entire process happens in a giant mixer, called a cement kiln. [2] The most popular kind of cement is portland cement, developed in England in the early 19th century. [3]

concrete // ˈkänˌkrēt

Concrete is an artificial building material, which consists of a binding agent like cement or lime, in addition to water and aggregates (sand and gravel) as well as potential  additives (like fly ash or plasticizers). The cementitious part gets liquified with water. By adding water to the cement a chemical reaction is caused and the process of crystallization begins. In the next step some additives such as gravel and sand are added. These aggregates are held together by the liquified cement. Once the whole mixture is cured, this process will finish with a solidified product, called concrete.

mortar // ˈmôrdər

Mortar is a workable paste, used to bind bricks, stones or to fill gaps and holes. The basis is made out of a binding agent (such as slaked lime, ash or, most commonly nowadays, cement) added with water and a fine aggregate, mainly sand.

Mortar is one of the oldest building materials, used for many thousand years. For a long time, slaked lime, volcanic ashes or clay worked as a binding agent. During the nineteenth century portland cement was invented. From that time cementitious mortar rose in popularity and replaced the old binding products.

These two kinds of mortar differ in two ways. On the one hand cementitious mortars usually are more workable due to faster curing, higher water resistance and less cracking, on the other hand non-cementitious mortars significantly cut greenhouse emissions while processing. It even can absorb CO2, which appears to happen when lime mortar cracks, so that air (especially CO2) can be absorbed. By absorbing CO2, lime mortar is even molding and gets even stronger.[4] To put it plainly:  it’s an environmentally friendly and more sustainable alternative.

reinforced concrete // ˈˌrēinˈfôrst ˈkänˌkrēt

In most cases concrete is combined with steel rebars, to compensate for the low tensile strength. The capability of concrete to react on compressive load is ten times bigger than the capability to bear tension loads.[5]

A more advanced and further developed version of conventionally reinforced concrete is prestressed concrete. To make concrete structures more durable against tensile forces, tendons, a high performing kind of rebar gets tensioned. Mainly these tendons are wires or threaded rebars. When applying in the casted concrete, the concrete part gets compressed, which gives the structure a higher performance, while being in service. [6]

Why is cement concrete so popular?

There are many reasons for its popularity: its liquid stone characteristics were revolutionary and created the possibility to make nearly every form out of concrete.

Cement concrete structures can be segmented and precast, making it suitable for big construction projects; and once solidified, it is a very strong material with the ability to bear high amounts of load. Designers adopted the versatile material, and nowadays we find furniture and accessories made of this material, in every kind of shape.

The use of concrete can be dated back to the ancient times. Romans mastered the use of hydraulic lime as a binding agent, called “opus caementicium”. After the fall of the Roman empire, the use of concrete faded, till it got resurrected in the early 19th century. Instead of using hydraulic lime, portland cement, a further development of the ancient version, was invented and led to a big rise in popularity of concrete in building industries. The first buildings during this time were bridges, foundations and harbours, facilitated by the compressive strength and workability of the new material.[7]

In the late 19th century iron rods, and later steel rebars, were added to poured concrete to increase tensile strength. It was mainly developed by the French Joseph Monier [8]  – an invention which is ubiquitous in building industries nowadays. This invention led to a big rise in popularity in the residential and social housing sector. In comparison to conventional houses in those days, new concrete based housing projects were more durable, termite and fire resistant. The workability of concrete made it fast and easy to use on site. Pre-castable and serial development of construction elements cut costs significantly. In the 50s of the last century, concrete played a major role in evolving the architectural style of Brutalism, a socio-aesthetically driven architecture movement of showing raw, honest constructions often used for big scale civic and public projects. This architectural style was a dominating force during the next two decades. [9]

In addition, the raw materials of concrete are available in large quantities around the globe, which makes concrete cheap to produce. Limestone, sand and gravel are quite cheap. The main processing costs are caused by the cement production.

What quantity of resources are needed to produce cement concrete?

Image showing 3.8t of concrete per person globally

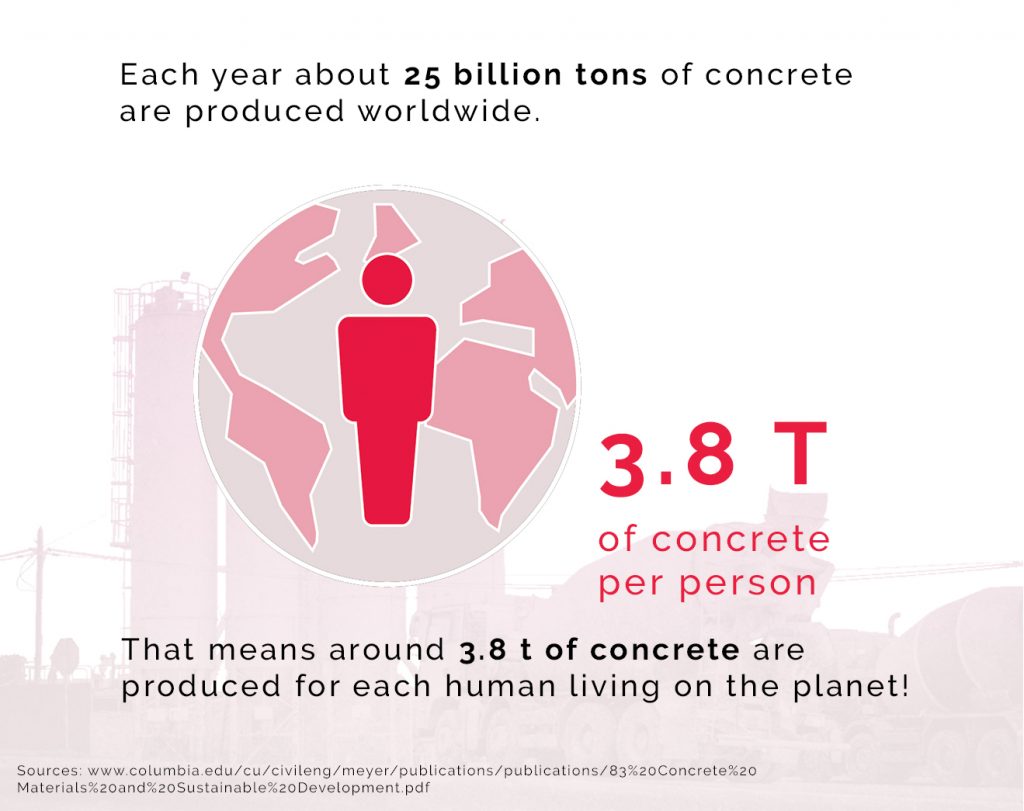
There are four main components of cement concrete (cement, water, sand and gravel). For reinforced concrete, there is an additional component – steel. Besides these materials, there are more raw resources needed to produce the main ingredients. To produce one tonne of cement, approximately two tonnes of raw limestone are necessary. [10] The production of cement is a high energy consuming process. One ton of cement takes about 120 kWh of energy in process heating. This energy is mainly obtained from fossil fuels and burning waste. [11]

The cement concrete recipe

There are several different recipes for making concrete. The recipes mainly differ in the ratio of cement and the added aggregates. Concrete can be mixed with different ratios to get a higher load bearing capacity or to get a higher ability to withstand different exposures, such as seawater, moisture or frost.

The following recipes just give you a basic overview about how a classic mixture of concrete could look like:
A standard concrete mix consists of 1 part water (7,7%), 2 parts cement (15,4%) , 4 parts sand (30,7%) and 6 parts gravel (46,1%). [12]

The higher the load the more cement you’ll need (f.e. a concrete column, foundation needs 1 part water (11,1%), 2 parts cement (22,2%), 2 parts sand (22,2%) and 4 parts gravel (44,4%) ).
Around 70% of the built concrete constructions are reinforced with steel, so you would usually have to add a certain percentage of steel rebars to the produced concrete (60-80 kg/m3 of concrete).[13]

That means a ton of average concrete consists of:

77 kg of water (7,7%)154 kg of cement (15,4%)307 kg of sand (30,7%)461 kg of gravel (46,1%)
Components of concrete
Components of 1 tonne of concrete

Where is concrete used?

The use of cement concrete has various fields of application in construction and design. Since it was developed in the early XIXth century as a powerful structural material, it can be found in several constructive elements. The constructive elements made out of concrete can be summed up in three main categories:

massive built horizontal and vertical load bearing elements such as foundations and walls, used for small to middle scale buildings, such as residential housing.filigree skeleton construction elements, such as pillars and beams, mainly found in high rise buildings and large scale commercial buildingsspecial construction elements for infrastructural and exceptional building typologies, such as bridges, tunnels, dams or bunkers.

Where is concrete useful?

Nowadays concrete is used in many different ways. All constructive elements can be made in concrete and in most cases they are realized with this material.
But is it really necessary to replace other common construction methods with concrete?
It makes sense to use concrete in constructions, where load bearing elements have to bear big compressive strengths. A high rise a few hundred meters high? A tunnel? A dam? For sure! – There are fields of application, where no other material performs as well as concrete but in many cases concrete is used in small scale projects, where it is unnecessary and over proportioned.

How sustainable is cement concrete?

Concrete is certainly one of the building materials which gives a nearly unlimited range of use. As mentioned before, there are many upsides to using concrete. But there are always two sides of the coin.

A general definition for sustainability is meeting the needs of the present without compromising the ability of future generations to meet their needs. Sustainability is often discussed in environmental terms. It can also be related to two other important topics: society and economy.

Obvious and hidden impacts on our environment

Graph showing global concrete emission percentages
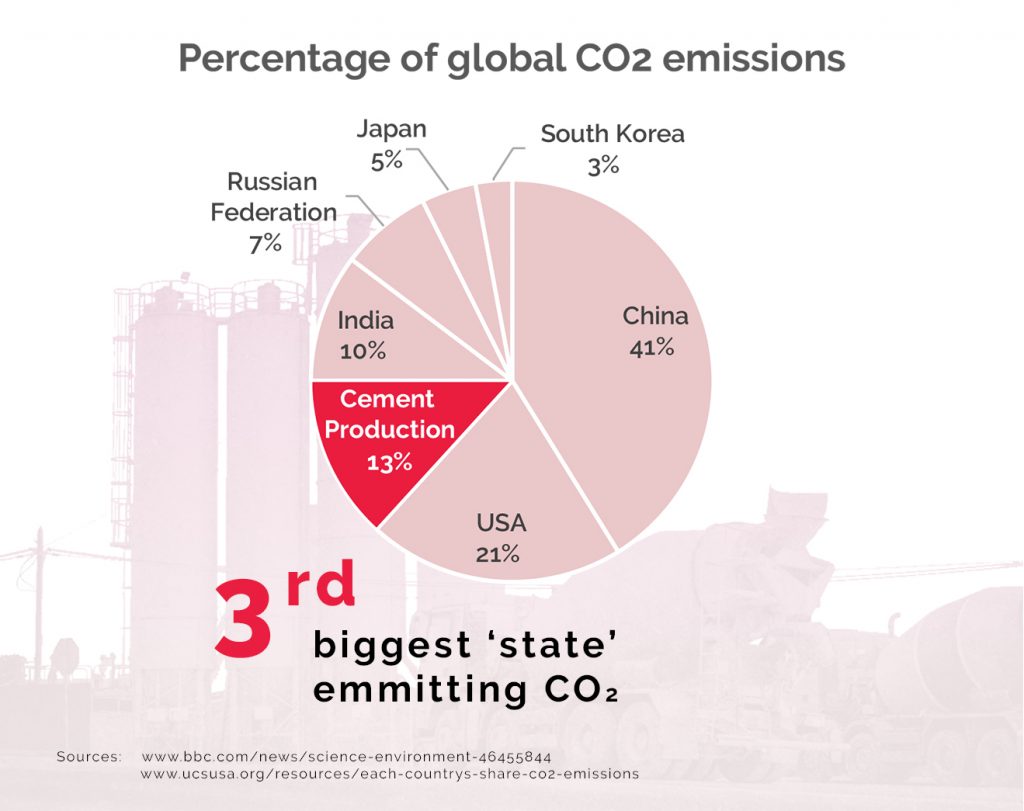
Pie chart comparison between countries CO2 emissions and cement production

The impact on our environment caused by the cement industry and by building with concrete is enormous. The production of cement is a high energy consuming process. This energy is mainly obtained from fossil fuels or burning waste [14] In addition the chemical process of producing cement releases one molecule of carbon-dioxide per each molecule of calcium silicate hydrate. For each ton of produced cement, one ton of CO2 is emitted just by chemically processing it [15] Besides the vast amount of carbon dioxide emitted, many other hazardous air pollutants such as NOX or PM10 are emitted during the process. [16]

Cement is just one part of concrete. The added aggregates, such as gravel and sand, are mined in humongous amounts to cover the demand of concrete industries. Many environmental systems are suffering from negative effects such as land loss by erosion, destruction of natural habitats, sealing and contamination of soil. Some of these aggregates, especially sand, have to be shipped around the world to service demands. [17] Just to give a short glimpse of one of the biggest cruxes in world of the concrete industries – new developing middle-east states, such as the United Arab Emirates or Qatar have to import big amounts of sand to service their huge demand in building industries, despite the fact that cities like Dubai or Qatar are located in the middle of sandy deserts. [18] However, not all of the sand we can find on the globe is suitable for concrete production; desert sand is too fine and round to be used as an aggregate. [19]
Furthermore, concrete production is a thirsty industry. It needs almost 10% of annual industrial water withdrawal, and 75% of the concrete production takes place in regions which are already facing water stress and drought. [20]

Beside this, the impact on society has to be emphasized. The internationalization of architecture and modern building technologies have a negative influence on vernacular building technologies and local architecture. New buildings tend to be built in a modern way with modern materials, such as concrete. Cost efficiency, the establishment of new building technologies and the time aspect are reasons for a significant decrease of traditionally built projects.

Impact of globalization and industrialisation on building traditions.

Diagram showing concrete accounts for 66% of building materials
Comparison between the use of concrete and other building materials

One of the main issues caused by that situation is the loss of building knowledge and traditions. Traditional building techniques are being replaced by modern approaches. Around the world, houses and cities have been built according to local tradition for centuries. Now, knowledge that was gained in a long and enduring process is about to get lost in a few decades.

Main drivers for the loss of vernacular architecture are caused by the growing globalization and industrialization of the world. Innovations in building technologies can be spread easily around a fully connected world. Rare materials not locally available can be easily shipped from anywhere – and they get transferred in humongous amounts around the planet.

Downcycling cement concrete

The economic sustainability of concrete is always mentioned as a big pro. Nonetheless there are a few facts which are not properly taken into consideration. The production of concrete is cheap in comparison to other materials. A main reason for this, is that the aggregates you need to mix concrete are available in large quantities almost everywhere around the planet. But in recent times the local availability of certain components, such as sand are diminishing. [21] Our resources on the planet are finite, so using and monetizing resources as if they are infinite is unsustainable. To address this, the concrete industry tries to emphasize their product as recyclable, but to make it clear – concrete is not recyclableRecycling means, returning a material into a previous stage of a cyclic process. In case of the mentioned material, this is not completely possible. During calcination, the processing of the raw resource of limestone comes to a point of no return. Once cement is made, the process is irreversible. There is no commercially viable process to recycle it.[22] Recent reusing methods of concrete consist of shredding it and mainly using it as gritting material for infrastructural projects. In some cases this crushed concrete can be used as an aggregate to partly substitute gravel in concrete. Nevertheless these substitutes are small in numbers and in the end new concrete still requires additional water, cement, sand and gravel [23] Technically, the recent approaches to recycling concrete can be better named downcycling processes or a kind of mitigation. Many experts criticize the bigger potential of reusing shredded concrete for new concrete projects, [24] an effort which should be broadened in the future.

Contradictive durability of concrete structures

Many proponents often mention concretes’ durability as a big pro. The use of concrete without adding any other materials (such as rebars, made out of metal) technically creates a very durable building material. Despite, most of the applied concrete is reinforced to be able to react on tensile stress. But the application of reinforced concrete in terms of durability is a contradiction in terms. Here nature inevitably can shorten the life span of buildings built out of reinforced concrete. Due to different thermal expansions and the inevitable inheritation of oxidation of the used steel rebars, concrete constructions suffer fast deterioration during their lifespan. Recent studies have shown that there is a 50% chance of reinforced concrete structures to not fulfill their service in terms of load bearing after just 35 years of use. [25]

What can be used instead of cement based concrete?

Concrete as a kind of fluid stone has found use in all fields of construction. But is it always necessary to use concrete? There are new materials and also tried and trusted methods of building which have mostly been replaced by concrete solutions. The replacement of conventional portland cement based concrete can cut greenhouse gas emissions and other environmental impacts significantly. Basically there are two main ways to avoid a humongous use of classic portland cement based concrete. The first one is to substitute or avoid the most polluting ingredient of classic concrete, portland cement. In a second scenario different building approaches with alternating materials or other building techniques can be applied.

Cement substitutes

First of all, portland cement based concrete mostly can be substituted by pulverized fly ash (PFA), which is a side product of coal burning processes. Another substitute with a big potential is Ground Granulated Blast-furnace Slag (GGBS), which is able to replace portland cement up to 90%. GGBS substituted concrete sets more slowly than concrete made with ordinary portland cement. The higher the amount of GGBS in the cement mix the longer it takes to cure. Besides this, a positive side effect of using GGBS substituted concrete is that it continues to gain strength over a longer period leading to improved overall durability and life expectancy. [26] Nevertheless the mentioned substitutes are by-products of other industries, such as coal, steel or aluminium production, which also have an enormous negative impact on our environment.

Green concrete

During the last decade several scientists started working on green alternatives for concrete. The most advanced approaches use micro organisms such as algae, bacteria or fungi for biocement production (CaCO3) by using the metabolic activity of these microorganisms. [27,28] Some of these bioproducts achieve similar specifics as classic portland cement and present a feasible and viable alternative to conventional portland cement based concrete.

lternative construction methods

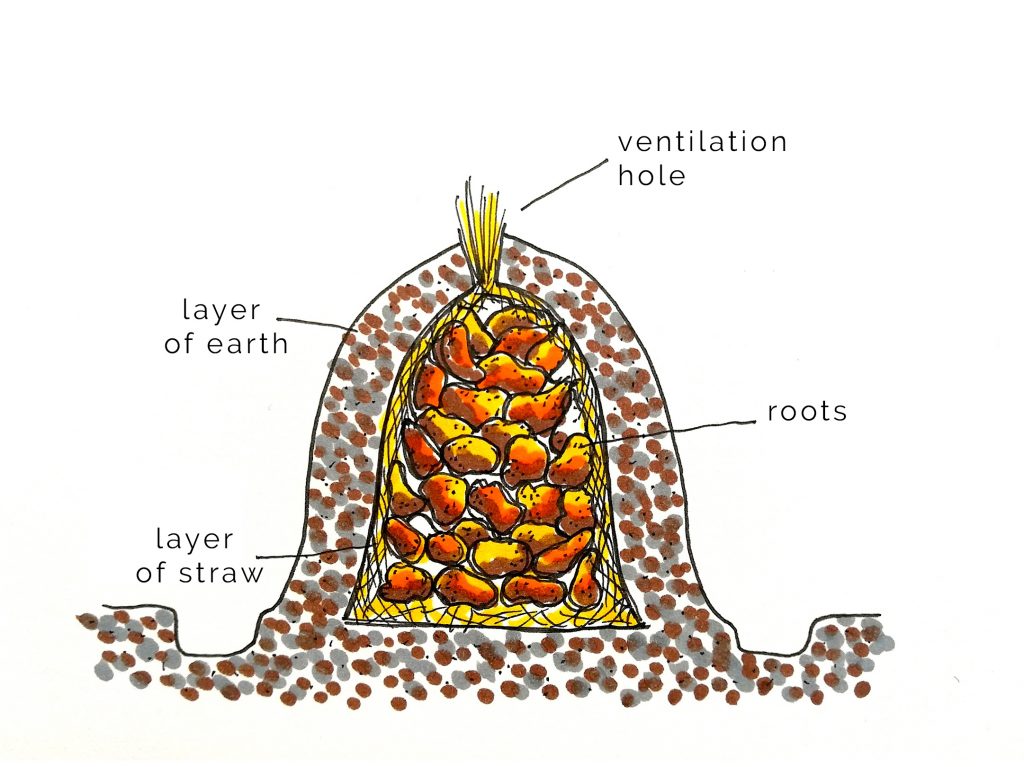
Besides an ingredient-related replacement of conventional concrete, there are many tried and trusted construction methods which were applied in vernacular building styles and local architecture traditions. There is no convincing evidence that justifies concrete as the ultimate building material for most building tasks.

This table aims to present a series of more ecologically friendly solutions for common uses of cement concrete:

construction elementclassic building material
to be replaced / substitutedeco friendly alternative (not exhaustive)foundationsreinforced concretetyre foundation (for point foundations) [29]
gabion foundations [30]pillarsreinforced concrete
steelwooden constructions (bamboo, pine, GLT – glue laminated timber)
cardboard tubeswalls(reinforced) concrete
bricks
steel sandwich panelswooden constructions (CLT – cross laminated timber, framework constructions)
rammed earth (clay)
hempcrete
bricksflooringcement based screedclay
wooden planks roofsreinforced concrete (flat roofs)
steel sandwich panelswooden constructions
thatched roofs
green roofs
hempcretepathingcement based pavement
asphaltnatural stone :
cobblestone, granite plastergypsum based plaster
cement based plastercardboard + lime plaster [31]
hempcrete plaster
straw clay based plaster

Conclusion

Concrete plays a major role in building industries. The further development of newly industrializing economies with huge demands on concrete are driving the ongoing trend of a growing concrete industry. Beside its advantages and big popularity, concrete brings a lot of negative impacts on global warming, environmental systems, building culture and social city development. It is important to mention that concrete lacks recyclability. The present system around the concrete industry can be summed up as a cradle-to-grave system. Resources are extracted, used and then wasted and dumped or downcycled in the best case scenario. Due to the chemical process, cement, the most important ingredient of conventional concrete, will never be recyclable, which underlines the unsustainability of a whole industry. Its fast and wide availability and low costs in production make it popular for many large scale projects.

Nevertheless there are recent approaches to develop more sustainable alternatives to the classic portland cement-based concrete by trying to avoid or minimize the use of cementitious components, aiming for a better reusability and recyclability of resources.

In addition, investigating forgotten vernacular solutions reopens fields of research to move forward to a more environmentally respectful architecture. Stay tuned on our continuous research, on social media and if you can and feel like supporting the initiative, make a small donation on our Patreon!

Sources

[1] https://www.sciencedirect.com/science/article/pii/B978008034720250023X , opened 12.08.2020

[2] https://www.britannica.com/technology/cement-building-material/Extraction-and-processing , opened 12.08.2020

[3] https://www.screedscientist.com/portland-cement-a-brief-history/ , opened 18.08.2020

[4]  Quantitative Analysis of CO2 Uptake and Mechanical … – MDPIwww.mdpi.com › pdf , opened 23.09.2020

[5] https://diglib.tugraz.at/download.php?id=576a7195cc9f9&location=browse , opened 11.08.2020

[6] 372R-13 Guide to Design and Construction of Circular Wire-and-Strand-Wrapped Prestressed Concrete Structures , 2013

[7] Historic Concrete in Scotland Part 1: history and Developmentpub-prod-sdk.azurewebsites.net › api , opened 13.08.2020

[8] https://www.britannica.com/biography/Joseph-Monier , opened 13.08.2020

[9] https://www.architectureanddesign.com.au/features/list/a-look-at-brutalist-architecture , opened 20.08.2020

[10] http://ecosmartconcrete.com/?page_id=208 , opened 12.08.2020

[11] https://global-recycling.info/pdf/GLOBAL-RECYCLING_2-2019 , opened 11.08.2020

[12] https://www.marshalls.co.uk/gardens-and-driveways/blog/how-to-mix-cement-to-make-mortar-or-concrete

[13] https://diglib.tugraz.at/download.php?id=576a7195cc9f9&location=browse , opened 26.07.2020

[14] https://global-recycling.info/pdf/GLOBAL-RECYCLING_2-2019 , opened 11.08.2020

[15] http://ecosmartconcrete.com/?page_id=208 , opened 12.08.2020

[16] http://ecosmartconcrete.com/?page_id=208 , opened 13.08.2020[1] http://ecosmartconcrete.com/?page_id=208 , opened 13.08.2020

[17] https://www.globalconstructionreview.com/news/shifting-sands-concrete-hungry-singapore-orders-mi/ , opened 28.07.2020

[18] https://www.bbc.com/worklife/article/20160502-even-desert-city-dubai-imports-its-sand-this-is-why , opened 19.08.2020

[19] https://www.bbc.com/worklife/article/20160502-even-desert-city-dubai-imports-its-sand-this-is-why , opened 19.08.2020

[20] https://www.nature.com/articles/s41893-017-0009-5.epdf , opened 26.07.2020

[21] https://www.globalconstructionreview.com/news/shifting-sands-concrete-hungry-singapore-orders-mi/ , opened 29.07.2020

[22] CSI-RecyclingConcrete-FullReport.pdf , opened 29.07.2020

[23] https://www.archdaily.com/933616/is-it-possible-to-recycle-concrete, opened 30.07.2020

[24] https://eu-recycling.com/Archive/22163 , opened 30.07.2020

[25] https://www.structuremag.org/?p=9459 , opened 18.08.2020

[26] https://www.greenspec.co.uk/building-design/concrete-cement-substitutes/ , opened 25.08.2020

[27] https://www.mdpi.com/2071-1050/10/11/4079#abstract , opened 25.08.2020

[28] https://www.sciencedirect.com/science/article/pii/S2215017X18302923 , opened 25.08.2020

[29] https://criticalconcrete.com/tyre-foundations/ , opened 25.08.2020

[30] http://bristolgreenhouse.co.uk/site/foundations.html , opened 25.08.2020

[31] https://criticalconcrete.com/out-of-the-box-vol-3/ , opened 25.08.2020

The post The reality of concrete first appeared on Critical Concrete.
Did you miss our previous article…
https://www.akbarconcreteworks.com/?p=171

Charring Station

Charring Station

Interested in learning more about this topic and more social and sustainable ways of doing architecture? Apply now for our Postgraduate!

In the former articles was explained some of the advantages to be found within these ancient  common methods of charring wood. Historically and within many cultures, there are a myriad of charring modalities. In this article you will find adapted and illustrate one of those methods using a small wood burning flash oven that can effectively provide the charring levels needed without overtly case timber that has been dried too rapidly. This leads to reversed stresses; compression stresses on the shell and tension stresses in the core. This results in unrelieved stress called case hardening.[1]) the wood items placed through it. In this article we explain how our charring station is built and how it works. Charring systems like this one have been commonly found in many cultures and this is an adapted version of several of those [2]. It is adaptable, is easy to operate and runs without the use of gas or special tools. All that is needed are some (fire) bricks and scrap wood for fuel.

Counter-intuitively, charring wood has several astonishing advantages without involving any chemicals or additional energy consumption. The idea is to sear the surface of the wood without combusting the whole piece nor damaging the interstitial aspects of the wood so it will not warp over time. Besides giving the material an interesting and unique look, the process leads to a triple protection, all without the need of repeating the process after some time has past:

fire protection – charring the surface starts a superficial carbonation of the material and thus lowers the thermal conductivity. termite and mold protection – charring wood destroys the wood’s nutritional value to insects and fungi.water protection – the enhanced carbonation gives the charred layer a waterproof resistance, as water slips on burned wood like over an oily surface.

The easiest and most popular way to char wood commonly found today is probably with a blow torch. This can work, but regrettably too often performed without the attention to detail not to stress the wood from within. It’s easy and practical,  especially for small or irregular pieces but has to be performed with caution. But when searing many big wooden pieces it is slow and uses a lot of gas. These searing modalities are not to be confused with traditional Japanese, 焼杉 (Yakisugi) which is often misrepresented as 焼き杉 (aka shou-sugi-ban”) [3] – us included, in our previous articles!.

Yakisugi can only be achieved with a limited range of Cypress species found on the islands of Japan[4] and is a very unique process found within several methods of crafting guilds. The most commonly seen being where three planks of wood get bound together to form a long triangle and a fire is started in the resulting tube. There are several other methods, but they are for very specific formats and within context to only yakisugi and not the charing modalities found within other cultures.This technique works well only when you have similar boards, as it’s complicated to set up when boards have different widths and lengths.


Terunobu Fujimori, Tea House, Barbican. Photo Ben Tynegate

The birth of the charring station

This contemporary oven is based on some of the principles of a rocket stove. The main idea is to create a fire within a brick tube, which will become very concentrated and strong due to the tube-generated draft-effect (for more explanation on this and general information, check our articles on rocket stoves). Just over the burning material, where the fire is very strong, there will be small slots on the opposing sides of the tunnel. The wood, which needs to be seared, can be passed easily through the fire and thus be charred fast and safely.

After this oven was created with commonly available materials which enables us to char planks and boards of different sizes in an effective manner. This oven also allows the operator safety by lowering the risk of burning their hands, while also providing more control of searing the wood and less waste of fuels which is then more environmentally friendly.

How does the charring station work


Author: Melana Jäckels

1 – The main part is a L-shaped tunnel. On the bottom it has an opening on the side, where the air goes in and it flows all the way through the tunnel up to the upper opening.

2 – Right after the curve, the fireplace is based on a second layer. Its bottom has two small gaps for the air to pass and to allow the finer ash to fall.

3 – It is important to have a tunnel that is at least 5 cm wider than the boards you plan to char. If a board fills the whole wide of the tunnel it stops the draft and decreases the fire.

4 – On the same level as the fire is also the stair-like firewood intake. The fire is started and fed from here. It’s important to have a brick to close the firewood intake so it does not disturb the air draft in the moments no wood is inserted.

5 – In the chimney, right above the fire, there are two vertical slots on opposing sides to insert the wood you want to char.

6 – Above the inserting slots the chimney narrows slowly. This is important to not happen in a sudden step, as it otherwise will decrease the draft and create a lot of smoke coming out of every small gap.

Building your own charring station

For our charring station we used 12 big bricks (ca. 29x18x9), around 70 medium-sized, red bricks (ca. 23x10x7) and 5 fireproof bricks (22x10x2). Depending on what is available, numbers and materials might be adjusted. Before starting the building process, it is important to choose a big outside space, which is not too windy and has a relatively leveled ground, with enough space on each side of the station to pass the board through.

Step by step:

First, we made a fire-resistant base which is leveled and flat. For this we used the big bricks

Afterwards we started to build a tunnel for the air intake with dimensions of 90 to 25cm. It is important that it is stable and possible to close with removable bricks on the sides

We covered the tunnel with the red bricks and left two gaps of about 1,5 cm each as seen in the picture.

The fireplace gets covered with fireproof bricks and the next line of bricks is put on all sides

To protect the walls, we also placed fireproof bricks around the fireplace


The next step is to build the J-shaped intake with steps made of bricks, towards the fireplace. It is important to make sure its height will match up with the next row of bricks


Now it is time to create the slots where the to be charred boards will be inserted. For that we put two bricks flat across from each other. This  station works  well for boards with a maximum width of 16 cm. If you plan to use a roller stand, make sure the height of your slots measured from the ground is adapted to the height of the roller stand)


Above the slots we continued building the chimney in the original diameter for a few more rows, but then we start to become narrower by changing the order of the bricks

In this timelapse video you can see how we built up the station in 10 seconds!

How to use the Charring Station

Before starting, make sure to have the right equipment (fire resistant gloves, a mask, a bucket of water / sand, and a fire extinguisher) and enough material to burn! If you want to char a big quantity of wood it is also quite handy to have rolling stands.

Starting the fire works best when you build a little teepee out of dry kidlings and put some sawdust on it, light up the tip of a rolled paper (A4 is enough), and move it slowly into the directions of the teepee. Besides you can put another burning paper over the chimney, to facilitate the draft-effect.

To avoid unnecessary interruptions, it is important to have a constant refilling of firewood. As soon as the fire burns strongly, the opening of the firewood intake can be closed and the boards can be inserted through the slots. Inside, the strong and concentrated fire will char the surface of the wood from below and the sides. The boards should be pushed through the fire in small steps to have a satisfying and regular result. After the first part of a board is charred, it can be taken out and pushed upturned through the fire again until both sides are completely charred. If the results are not satisfying, the pace should be adapted. Depending on the size, form and species of the wood it will take its respective time to finish one piece.

Once the board is charred it should be brushed with a metal brush and oiled. As the charring process dries the wood very rapidly, depending on its nature it might have a tendency to crack. The linseed oil will nurture the wood and compensate for this effect. For more information on this see our article on Natural Wood Protection.

Conclusion

We are using this method for a while now and we are super satisfied with the results. Not only we save time but also we are more independent of gas. The work with the charring station is safe and convenient. The station is easily adaptable and can be modified to different dimensions. We are looking forward to using the station in the future and improving it further.

Check our YouTube video for a step-by-step tutorial how to build up your own station!

We would like to sincerely thank Jay C. White Cloud for his time, valuable input and collaboration on this research.

How to store food outside of the fridge

Sources

[1] Wikipedia “Wood drying”, [Online] available at https://en.wikipedia.org/wiki/Wood_drying (Last accessed in July 2020)

[2] Jay C. White Cloud [Tosa Tomo Designs] https://about.me/tosatomo

[3] [4] Nakomoforestry “Yakisugi” Or “Shou Sugi Ban”? Learn What You Should Call It, And Why”, [Online] available at https://nakamotoforestry.com/yakisugi-or-shou-sugi-ban-learn-what-you-should-call-it-and-why (Last accessed in July 2020)

Picture: Terunobu Fujimori, Tea House, Barbican. Photo Ben Tynegate [Online] available at https://www.ben-tynegate.com/tea-house (Last accessed in July 2020)

The post Charring Station first appeared on Critical Concrete.
Did you miss our previous article…
https://www.akbarconcreteworks.com/?p=167

(Urban) Food Forest

Agriculture nowadays is one of the most harmful industries in the world. It is estimated that around one quarter of the world’s emissions is coming from this sector (1). If we were able to transform today’s techniques into a mindset and strategy that rather than exploiting the environment even has a positive impact on nature, we would be able to start regenerative processes on a big scale.

“We have disconnected ourselves from life on the planet, thinking that we are the intelligent ones.
But can’t see that we are just part of an intelligent system.”
from Ernst Götsch

Food…what?

A food forest, also called an edible forest garden, is a cultivation method that is inspired by a natural forest system and inhabits a large number of plants, ranging from vegetables and berry bushes to big fruit trees. Food forests benefit from the symbiotic interplay of the different plants and thus offer a large variety of crops without the need for intensive maintenance.


Pictures from Silver Leaf Farm, Skala, Greece
© Southern Lights Project

What is a food forest?

Conventional cultivation and gardening methods are exactly the opposite of what make the forest system work. In order to make the harvest easily accessible with large machines, only one species is cultivated in separate rows in each field. All dead organic matter is cleaned up and the missing nutrients are added through fertilizer or chemicals.


Plants disposition in a monoculture orange field
© Southern Lights Project

In a natural forest, plants automatically take up the space that is most suitable for them to receive the resources they need. Doing so, they also create or improve the habitat for other plants. The result is a deeply interwoven network of very different and complementary species benefiting from each other. Organic matter deriving from the plants and the plant’s fruit plays a crucial role in this circle. Left on the ground, it stores humidity and prevents the soil from drying out while it decomposes to nutrient-rich soil. In ideal circumstances, no human measures like additional nutrition or irrigation are required to keep this system working. The idea of ​​a food forest is not to reproduce a natural forest exactly but to have it as a guiding model for creating a resilient and productive structure that is adapted to our needs. This concept shows how the basics of the forestial system can be applied to agriculture. It mimics the main principles of a forest and consists of perennial trees and plants that provide food. They are planted in such a way that the layer they occupy in their original habitat is respected, providing the ideal conditions in regards to sunlight (2). Every operation is done in order to reach an energetic positive balance in the system, so the system regulates itself.


Pictures from Silver Leaf Farm, Skala, Greece
© Southern Lights Project

What are the impacts of a food forest?

On the one hand, a food forest rewards its creators with many advantages. Similar to natural forests, human intervention can be reduced to a minimum because the system is mainly self-regulating. With a well-designed system also the harvesting process is not necessarily more time-intensive than in monoculture. On a smaller scale, where a food forest is mainly used for self-sufficiency, the variety of products supports a healthy and balanced diet. On a larger scale, this variety of products spreads the financial risk across many types of income opportunities by breaking the dependency on one crop only. In addition, the positive impact of cultivation led by food forest principles goes far beyond personal advantages. It does not just enrich the local biodiversity of plants, but by creating a natural habitat it also increases the diversity of animals, especially insects. Farming in a food forest way can kick-start and facilitate processes to save and recreate endangered ecosystems. Furthermore, as the enriched soil, the organic matter, and the plants keep humidity and bring shade, a food forest has an enormous impact on balancing the microclimate. Thinking big, the wide-spread use of food forest principles in agriculture could lead to a considerable effect on the climate.


Lizard Eggs
Pictures from Silver Leaf Farm, Skala, Greece
© Southern Lights Project

The key principles of the food forest

Disposition of plants

The design of a food forest garden requires a long-term mindset with the attitude to look patiently into the future. In fact, the natural system takes some time to strike a balance between the species, the final forms of the plants and their proper growth. Nevertheless, it is possible to get fresh fruit and quick results from the smaller plants since the beginning of the process, as those take a short time to adapt and grow. These plants also help prepare the good soil and habits for larger plants.

A food forest garden is usually made up of layers of different plants that strategically help each other throughout their life. In good conditions, the plants themselves occupy the layer to which they naturally belong. In an agroforestry system, eight layers of plants usually have to be organized:

The Emergent layer is the tree layer that overtops the other trees, forming its crown above them. This shows us that they need maximum sunlight and do not tolerate shade. Usually, trees of this layer have only a few branches on the trunk, concentrating its growth on the crown where the sunlight is. Typical for this layer are the date palm, walnut, and pear trees.

The Canopy Layer is composed of large fruit trees, nut trees and leguminous species with large crowns that are providing a good amount of shade during the dry and hot period. Plants are not in competition for reaching good soil, but only for capturing sunlight: trees are actually able to adapt their shape and to grow in harmony with other species to reach the best light spot. Examples for plants of this layer are mulberry, olive, fig or apricot trees.

The Understory Layer consists of small fruit trees and nut trees. Species of this layer prefer a good amount of sunlight but tolerate some shade. Examples for this layer are almond, orange, plum, nectarines, pomegranates, and apple.

The Shrubs Layer is composed of trees that need to be protected from direct sun. Plants of this layer are hazelnut, most berry shrubs and bananas.

The Herbs Layer is composed of short herbaceous plants, often annual.

The Groundcover Layer contains grasses, creepers, and low growing plants that protect topsoil from erosion and drought. This layer slows the speed of raindrops to lessen their impact and protects the soil’s dedicated network of roots, sand, organic matter, and hyphae (fungal roots).

The Vertical Layer is composed of climber plants that grow up trunks and branches of the bigger trees.

The Roots Layer is really important because it pulls up minerals trapped in rocks to the plants: it is composed of tubers, rhizomes and bulbs.


Typical disposition of plants in a food forest system
Infographic: Critical Concrete

Thanks to the layered diversity of species, food-forest projects provide diversification of products over monoculture cultivations: each layer is in fact offering a specific variety of food in different seasons, from fruits and berries to tubers and mushrooms. In contrast to a monoculture, that requires the fixed distance between plants, agroforestry allows us to reach a much higher density of cultivation, as plants overlap in layers.

Pruning & organic matter

As mentioned before, food forests are designed to reproduce a sustainable and working forest system in which external help and additional human activities are limited, except one: pruning. “Chop and drop” is the key activity that provides the quantity of organic matter that becomes compost to fertilize the soil, extremely important to increase root activities and feed the plants. Pruning plants is also essential to help plants to breath, grow more and reach a good amount of sunlight, encouraging chlorophyll photosynthesis. The photosynthesis is pushing the mycorrhizae, a symbiotic association between a fungus and a plant, playing an important role in plant nutrition, soil biology and soil chemistry.


Pictures from Silver Leaf Farm, Skala, Greece
© Southern Lights Project

The fertilization of the soil is constantly influenced by the production of new organic substances: the pruned branches that remained on the ground become water collectors in the rainy season and release moisture and water in dry periods. Following food forest principles is a good way to fight the soil exhaustion on a small or large scale. In fact, the use of different plants determines a symbiotic interplay in the use of the soil and is balancing nutrition resources. Every kind of soil could be defined as a “good” one: what matters is the amount of organic matter that determines the continuous fertilization of the soil. The soil is, also, acting as a sponge being a water and minerals container. Understanding of the importance of organic matter for the water management of the system can be found in the following numbers: If the amount of organic matter in the soil is increased by only 1%, an additional of 175.000 liters per hectare of water can be stored in the soil.


Comparison between an arid soil (left) and good one (right) rich of organic matter
© Southern Lights Project

Interview with Sheila from The Southern Lights Project

Food Forest had been proven a successful phenomenon on a smaller scale on a personal as well as on a commercial base. An amazing example for a prosperous sustainable business is the food forest farm The Southern Lights in Skala, Greece. Based on the organic farm of her father, Sheila introduced food forest features into her place, now cultivating more than 80 crops from which the farm and its employees can have a reliable income.

What do I need to start a food forest?

“There is no minimum size, you can start a food forest on a spot as little as one square meter. It is helpful to have or gather some knowledge of the plants you want to put, especially their layer. And finally, you need to add a lot of organic matter..”

Are there any plants that are not so suitable for food forest?

Some plants might be not so easy to work with, like for example grains or rice and you will not get too much crop from this. But it is important to know your plants and things that might work out in some other conditions might not work out for yours.“

Should I be afraid of invasive species?

“If a species is invasive in your place, that means something is missing. Actually, those so-called “invasive” or pioneer species prepare the soil with their organic matter for other plants that have higher demands on the soil.”

Can I combine a food forest with animals?

“Animals can be very helpful for your food forest. They help to decompose the organic matter as they eat it and literally poop fertilizer. But I would rather keep my place welcoming to every species that feels comfortable in my place instead of bringing animals from outside.”

How can I know if my soil is good soil?

“Your soil should look like the soil in a forest, meaning you find a lot of organic matter on the ground, even if the very surface is dry, it is humid within deeper layers. And if you can find worms, mycelium and mushrooms it is a very good sign.”

What is the difference between “permaculture” and “food forest”?

Permaculture is a design technique, which can be applied to any kind of context. Its main ideas are Earth Care, People Care and Fair Share achieved through many principles, for example, to observe and interact or integrate rather than segregate. A food forest is a good example showing this principle being applied.”

Extract from her lecture, to see the whole presentation check our YouTube Channel

How to bring these principles to a larger scale?

A common prejudice concerning the adoption of the food forest concept to a larger scale might be the assumption that due to its unregulated structure, a forest-inspired agriculture might not be workable with large machines. But projects started and inspired by Ernst Götsch, a swiss botanist working in Brazil, had shown that large scale agriculture and the principles of a forest can go astonishingly well together.

He developed the concept of syntropic farming [Gr. syn, together with, trepein, to turn.]: usually, a minimum of 30 different species will be planted, taking into consideration their suitability to the local conditions, their ecophysiological function, their lifetime as well as the farmer’s productive goals. To make it workable with bigger machines and tools, most of the plants are cultivated in rows. In contrast to traditional farming, these rows not only consist of one single species, set apart for a few meters but follow the principles of agroforestry and food forests. These means, companion plants and trees from different layers are densely combined together to facilitate the supporting networks. Mostly fast-growing support species (like eucalyptus or mulberry) are mixed with income-generating fruit-bearing plants and trees. Natural processes are accelerated through heavy pruning of the support species in order to generate vast amounts of organic matter which will decompose to nutritious soil for the fruit trees and plants.

What all of them have in common is that the harvest is a side-effect of ecosystem regeneration, and vice versa – ecosystem regeneration is a side-effect of the efforts to produce a harvest.”
from Ernst Götsch

Bringing food forest to urban contexts

In view of the many advantages of a food forest, the question arises, how this principle could be brought into the urban context. Similar to existing gardening projects, food forests can contribute to make cities greener, bring communities together and reduce food transportation. The benefit of a food forest is that also perennial species are used. This means, once the structure of the food forest is in place, less work will be required than it may be the case with the replanting of annual vegetables. “Upgrade” existing urban gardening projects is a good start to bring the principles of a food forest into the urban environment, but also introducing it to the yards and gardens of school and kindergartens has been proven to be a good starting point so far.

But the most practical way to bring a food forest into the city is by starting one of our own! Thanks to the introduction to the concept and the following workshop from Sheila Darmos from The Southern Lights, our very own little food forest is growing in our workshop’s backyard.

dog laying near a box of flowers

Samuel Ciantar taking pictures

girls painting food forest wall


Critical Concrete Food Forest, Porto, January 2020In this video she will guide you through the planting of the different layers to set up your own edible forest.

Sources

(1) [Hannah Ritchie, Max Roser] “Environmental impacts of food production”, January 2020, online available at: http://ijsetr.org/wp-content/uploads/2017/10/IJSETR-VOL-6-ISSUE-10-1364-1369. (Last accessed in June 2020).

[Sheila Darmos] “The Southern Lights Project”, lectures and workshop, January 2020, online available at: http://thesouthernlights.org/. (Last accessed in June 2020).

[Ernst Götsch] “Syntropic Farm Project”, online available at: https://agendagotsch.com/en/. (Last accessed in June 2020).

The post (Urban) Food Forest first appeared on Critical Concrete.
Did you miss our previous article…
https://www.akbarconcreteworks.com/?p=166

Out of the box – Vol. 3

Out of the box – Vol. 3

Index

IntroductionOur researchWhy cellulose based insulation?Why lime instead of cement?Cardboard+lime insulationMaking and applyingConclusions and further steps

Introduction

In recent decades, we have seen many examples of individuals and collectives striving for a greener way of building: reviving traditional methods, favouring natural materials or including recycled elements in the process to limit the footprint. Critical Concrete embraced this aim from the beginning: in 2017, we started experimenting with cardboard based insulation, and since then we have been working with other materials (such as wool or mycelium) that can serve as valid alternatives to the more polluting conventional ones.

This article presents our journey and experience researching and developing prototypes for cardboard-lime based insulation. We will talk about why we decided to dig deep in lime and cellulose based materials, and what we learnt from our prototyping. Our research aims to deepen the recycled paper and cardboard potential as top sustainable insulation material.

Interested in using this technology in your project?

Critical Studio can help!

Learn More!

Our research

More expensive rents means more people having to live in precarious houses1. Housing poverty is one of the leading global issues2, affecting more and more people in the face of climate change. The lack of thermal comfort causes serious health issues, and is responsible for many preventable deaths especially among vulnerable and low-income communities.

housing deprivation portugal eurostat

In Portugal, where we are based:

Almost 20% of people claimed to be unable to keep their home adequately warm during winter.335.7% said their house is not comfortable during summer.4In 2018, at least 1 in 5 people lived in a dwelling with a leaking roof, damp walls, floors or foundation, or rotting window frames or floor.5

Our priority is to improve housing conditions through affordable and environmentally friendly solutions. This is the main reason our research lab has been focusing on insulation methods for many years.

We started experimenting with cardboard in 2017 due to the high performance of cellulose insulation. Our research began considering the advantages and handicaps of using corrugated cardboard as an insulation panel. So far, we produced boxes and panels for a low-tech insulation system and applied it in different summer school houses, in cases the insulation could not be applied on the exterior of the house (houses in line, no space in the street, etc.).

Last  year, we decided to move forward in our research and try to find a method to continue producing cellulose based insulation but on a larger scale, since we wanted to continue developing an insulation that would be mineral-based and would not need to be covered by a plywood board or equivalent.

Why cellulose based insulation?

Cellulose is the organic compound mainly used to produce paper and cardboard, and other wide varieties of derivative products. It works as a very competitive insulation material, “depending on manu- facturing and method of installation and is comparable with other types of insulation. It has an average thermal conductivity being of about 0.040W/mK (similar to glass wool and rock wool insulations)”.6

Paper and cardboard are extensively used and abundant resource. Reusing and recycling cardboard locally7 also reduces emissions substantially:

In 2016, 50 660 000 tons of paper and cardboard wastage were produced in the European Union. Almost one million (905 137 tons) just in Portugal.8That year, within the EU, 72% of that waste was recycled. Whilst in Portugal the percentage was 55%.9

This means that we may take advantage of a material with high insulation performance and avoid it to become disposal waste at the same time, adding a new step in its life cycle.

There are many examples of people working with cellulose based materials, as the known papercrete, which since the ‘90s has been used in informal bio-constructions around the world. Papercrete is the building material made of paper pulp and cement. The main advantage of it is “that it is lightweight but sturdy enough to bear loads10. But we didn’t want to use cement.

Why lime instead of cement?

Cement became especially relevant during the industrial revolution and it has changed our way of building from that moment. Nowadays, as an affordable and easily accessible material, cement might seem like the perfect solution to achieve efficient results quickly. However, the environmental impacts of the material are very concerning.
The most well known fact is the excessive CO2 emission of the cement industry, as it occupies 3rd place of global CO2 emissions11. But even if emissions dropped gradually with innovation efforts to create the green concrete12, we are not sure if the industry will ever be fully sustainable and carbon-neutral.

Why? Because the environmental harm does not stop with CO2 emission. We have to keep in mind:

other additives in the material’s production,excessive water usage (both during cement production and construction with concrete), centralized production, lack of perspirability of cement forces the combination with other unbreathable, synthetic materials.complexity/impossibility of recycling concrete, often reinforced, combined with lightweight materials, or in complexe composite materials,that concrete surfaces trap heat and prevent rainwater absorption,

That makes cement the ultimate enemy in sustainable architecture. It is time to opt for alternatives. To reduce our environmental impact, we put our votes to use lime: in contrast to cement, lime is biodegradable and fully-recyclable (even on bricks), and most of the time, locally produced.

A more detailed article on cement will be published in the upcoming weeks, stay tuned!

Cardboard+lime insulation

Key concepts

Cardboard pulp: Cardboard soaked in water for at least 12 hours, and then squeezed and mixed with an electric mixerCardboard+lime paste: The whole mix we used for our prototypes. Its composition changed over time as described below.Quicklime: Calcium Oxide. CaO. The outcome of heating limestone. Slaked lime: Hydrated lime. Ca(OH)2. It is the paste result of putting enough water so that the quicklime combines chemically with it.Natural hydraulic lime: Ca(OH)2+reactives. It is used to make mortar which sets through hydration.

Since this last year, we have been working on what we call cardboard+lime, based on papercrete in which we swapped cement with lime. Our goal of producing insulation allows us to use a non-structural, but less harmful material. In the first experiment, we mixed lime and cardboard14 in a small brick shape which looked very promising in terms of resistance. We were really curious about what we could get from there.

The first question that appeared was which shape should we give to these prototypes: Should we continue with bricks? Should we try with panels? In our previous research, the amount of time that producing panels takes was one of the biggest handicaps, so we decided to look for a way to remove this step from the process. We opted for making shuttering molds and applying a cardboard+lime paste in situ.

First prototypes

We have made many prototypes, have learnt different new things from each one and have tried to improve in each new attempt. The second cardboard+lime paste was made from recycled cardboard that we got from Lipor, water, sand and natural hydraulic lime (NHL) and was applied in a temporary wooden formwork of 1 m2 and 8 cm of thickness.

cardboard lime insulation timeline

Recipe and setting process

We started with a basic mix made of (proportion in volume):

Cardboard15 pulp70%Sand 20%NHL 5 1610%

That first trial gave us an overview about the outcome we wanted to have and what was missing. In the following prototypes, we added borax for added resistance to fungi and mould. We also increased the proportion of hydraulic lime, reducing the sand; this made the mix easier to mix and apply. We got a better consistency in the cardboard+lime paste and we could notice it during the curing: the prototype was more compact and homogeneous.

Over time, we saw a small shrinkage up to 2% of their sizes and the terrible appearance of mould on the second and third prototypes. The cardboard+lime paste shrinks because of the amount of cardboard pulp –it tends to shrink when it loses its water– in the final mix; and the mould appears because of the slow setting process.

How did we try to solve this?

Adding slaked lime in order to kill any kind of life that wanted to appear.Adding plaster to accelerate the curing process.Reducing the percentage of cardboard pulp.

Thus, our final cardboard+lime recipe got its shape (proportion in volume):

Cardboard pulp62%Sand15.5%NHL 515.5%Slaked lime2.3%Plaster2.3%Borax2.3%

Shuttering and structure

In the beginning, the shuttering was thought of as a temporary structure –such as those we can see for making concrete– compound of vertical wooden pillars and boards. After the first prototype, we realised this was not feasible if we wanted the cardboard+lime to be a solid and permanent insulation attached to the wall.

In order to achieve a safe insulation that could last for years in place, we designed an internal structure secured to the vertical one and the wall in such a way that only the boards were removable. At the end, we decided to also add interior beams to completely ensure the cardboard+lime insulation.

Making and applying cardboard+lime

As the recipe and the structure evolved over time, so did the production process.. With the addition of new structural elements, such as the inner string and beams, the procedure became more complex.

We had to follow a step by step process in which the use of one tool or another could save us a lot of time, as well as the outcome could change completely if it was not followed properly. Furthermore, the setting process could be slashed depending on the context: are we working during Summer? Are we working in a humid zone? Do we have enough ventilation? And with it, the properties of the insulation.

How to make the cardboard+lime insulation
Disclaimer: Calculation for 1 m2 insulation. First, measure the whole wall you want to insulate and divide it in the best way it can fit. Also, if you are making the insulation in a stone/concrete wall, mark and make all the holes you will need.

Cardboard+lime paste – with the proportion referred before

For making the cardboard+lime paste we need to first prepare the cardboard pulp and the slaked lime (you can buy ready-made lime putty, but we used to make it ourselves).

Slaked lime

This is a dangerous chemical reaction, so we advise to use goggles, mask and gloves.


In a large metal container –nothing plastic though, as the heat generated by the reaction will melt it–, add one part quicklime to three parts water.Always add quicklime to water, and never water to quicklime, as it will spit, and can be very dangerous.The reaction should start and it can achieve temperatures over 100ºC.Wait until cooled down. Usually we prepared the mix at least one day in advance.

Cardboard pulp

For 1 m2 of cardboard+lime insulation, 6 cm thicker, you will need 65 l of cardboard pulp.


Tear/shred the cardboard into 4-5 cm pieces and drop them into a bucket until almost full.Pour enough water into the bucket to soak the cardboard pieces.Let the paper soak for at least 12h (and no more than 48).Attach the mixer to the drill and move it around in the cardboard to shred it to a pulp.Squeeze and reserve.

After having these two ingredients ready, we can start the mix!

In a concrete mixer, put half of the cardboard pulp, the hydraulic lime, the sand, plaster, borax and the slaked lime.Start the machine and add the rest of the cardboard pulp little by little to get a better mix.If you see the mix becoming small balls, stop and tear them apart. Mix again until having an homogenous mix.

Applying the cardboard+lime paste

For the shuttering we use 6×6 cm wooden bars and 100×33 cm plywood boards.

cardboard lime shuttering structure
Make the frame where the shuttering will be placed. Mark where the structure is going to be placed. Place a bar horizontally on the floor (a), attach it to the wall with screws. Place two bars vertically (b) with 1 m separation between them. Measure from the axis of each bar. Attach them to the wall with screws.Put four screws (c) drawing a ‘z’, two of them on the vertical bars with ~20 cm distance and the other two on the wall at the same high. Tie a string (d) ]to the first screw – the one closer to the horizontal beam on the floor–.Stretch the string to the next screw –the one at the same high that the one before–. Don’t tie the string because we will need to tight it later.


Screw the wooden board to the pillars.Start pouring the cardboard+lime paste until it covers the string. Press the paste.Tight the string.Pour more cardboard+lime paste.Stretch the string to the third screw, in diagonal.Pour more paste. Press it. – The more you press, the better.Tight the string, stretch it to the last screw on the pillar. Put a beam with nails (e) small beam]. Press.Repeat from point 2.

Setting process

Remove the boards after 3 days. There is no risk of downfall, but the cardboard+lime paste is still wet so be careful not to beat it. The setting process can last for many weeks until the insulation is completely dry, but with the proper conditions it should be around 3 weeks. During these three weeks the insulated room must be well ventilated – cross ventilation is always the best- to avoid the condensation and with it, the slowed down of the curing process.

Conclusions and further steps

After almost one year of researching and observing the behaviour of the different prototypes, it seems fair to say that cardboard+lime, with the recipe shown above, is indeed proven to be a promising insulation material.

But we ended on a process that is a bit crazy. We realized that applying cardboard+lime as we did needs specific conditions and a meticulous procedure. So, yes, for experienced building people cardboard+lime in this shape may work as an eco-friendly low-tech material. Nevertheless, our aim is to give to our society a environmentally friendly insulation material accessible for all.

How to store food outside of the fridge

Thus, now that we know that the material works, we are working to improve its shape. In our last prototypes, we decided to re-think the brick shape and made two blocks of 36x23x7.5 cm and one of 40.5x.17.5×3 cm. The outcome looks auspicious: easier process of making, less time to dry and highly resistance after the curing process.

The next steps include coming back to the panels with a hydraulic press that may allow a faster curing process and more consistent and resistant material. We keep working in this direction to maximize the potential of this insulation.

Notes and references

1 Marques Costa, R. (2019) Crise na habitação empurra mais pessoas para casas sem condições mínimas. Publico (PT) – https://www.publico.pt/2019/05/25/sociedade/noticia/ha-viva-condicoes-precarias-sao-realidades-escondidas-1873884

2 Habitat for Humanity (year) 7 things you should know about poverty and housing. https://www.habitat.org/stories/7-things-you-should-know-about-poverty-and-housing

3 Eurostat (2019), Inability to keep home adequately warm – EU-SILC survey. https://ec.europa.eu/eurostat/web/products-datasets/-/ilc_mdes01

4 Eurostat (2012), Share of population living in a dwelling not comfortably cool during summer time. https://ec.europa.eu/eurostat/web/products-datasets/-/ilc_hcmp03

5 Eurostat (2018), Total population living in a dwelling with a leaking roof, damp walls, floors or foundation, or rot in window frames or floor – EU-SILC survey. https://ec.europa.eu/eurostat/web/products-datasets/-/ilc_mdho01

6 C.-M. Popescu, D. Jones (2017) Cellulose, pulp and paper. Jones, D. Brischke, C. (Eds.) Performance of Bio-based Building Materials. [pp.75] https://doi.org/10.1016/C2015-0-04364-7

7 China Impacts Price of Recyclable Cardboard. https://www.phswastekit.co.uk/blog/posts/10-07-2019/-china-impacts-price-of-recyclable-cardboard

8 Eurostat (2016), Generation of waste by waste category, hazardousness and NACE Rev.. https://ec.europa.eu/eurostat/web/products-datasets/-/env_wasgen

9 Eurostat (2016), Treatment of waste by waste category, hazardousness and waste management operations. https://ec.europa.eu/eurostat/web/products-datasets/-/env_wastrt

10 Nubie, S. (2019) How to make papercrete: the ultimate building material for off grid living. Homestead Survival Site. https://homesteadsurvivalsite.com/how-to-make-papercrete/

11 Andrew, R (2019), Global CO2 emissions from cement production, 1928-2018, Center for International Climate Research. https://doi.org/10.5194/essd-11-1675-2019

12 IEA (2019), Tracking Industry, IEA, Paris. https://www.iea.org/reports/tracking-industry/cement

13 Recycled cardboard provided by Lipor – local trash collector company.

14 Over time, we realised that cardboard sweats the ink printed on it, so then we tried to avoid printed parts as much as possible.

15 Natural Hydraulic Lime NHL 5 NP EN 459-1.

The post Out of the box – Vol. 3 first appeared on Critical Concrete.